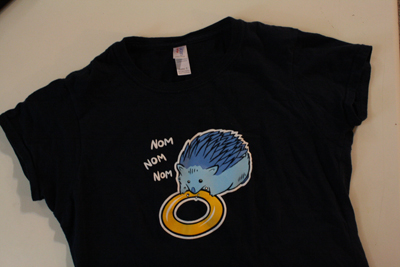
Let’s do another sleeveless t-shirt mod, before the weather gets so cold that even I can’t pretend sleeveless is seasonally appropriate.
I bought this charming piece from Sam Logan, the Vancouver-based artist behind the webcomic Sam & Fuzzy. (He has some truly wonderful t-shirts, understatedly geeky and entirely awesome.) I told him when I bought it that I was going to take my scissors and cut it up. I like watching alarm and dismay journey hand in hand across the faces of others, you see. (Actually, he was very understanding.)
Before I got around to modifying this shirt I wore it a couple times as a normal girl’s tee. As a result, I can give you another good reason to mod a t-shirt (even if it fits fine to begin with, which this one did): if you do fancy things to your shirt, it won’t be nearly so awkward when your friends show up wearing the exact same shirt, because yours will look different. You don’t want to be wearing the exact same thing as your friends – it makes you look like you’re on some kind of team. Or like you’re a bunch of Midwestern teenage girls.
This is probably the simplest mod I have done to date. So listen up, ladies, and I’ll tell you how to whip this together at home.
What you’ll need:
- sewing machine
- overcast stitch presser foot (if you don’t have one, you can still do this with a normal presser foot)
- straight pins
- thin elastic (1/4 inch wide or narrower)
- t-shirt you wish to modify
- thread in a colour that matches your shirt
Putting it all together:
1) Start by turning your shirt inside out and cutting off the sleeves. If you need to resize the body of the shirt (if it’s too wide), follow the steps from my earlier shirt resizing tutorial.
2) Fold the shirt in half and pin it together at the shoulders and under the arms, and along the back and front folds.
3) Draw a curving line from the shoulder to the front fold of the shirt, and from the shoulder to the back fold of the shirt. Cut along this line. This will be your new neckline. Don’t make it too big – one thing I’ve learned is to always cut the neckline smaller than I think I want it to be, and then it ends up just the right size.
If you had to resize a larger shirt, you’ll probably also want to cut the armholes down a bit, bringing them a little closer in towards the neck.
4) Attach your overstitch presser foot to your sewing machine. Follow the setting instructions for stitch width and so on that your machine’s manual gives you. On my machine, for example, I must have the stitch width set at 5 (maximum), the stitch type set at zig zag, and the tension set at A. I can mess with the stitch length all I want. Set your stitch length very low, either at 1 or on the buttonhole setting.
If you do not have an overstitch presser foot, use a normal presser foot and the following machine settings:
- stitch width: maximum
- stitch type: zig zag
- stitch length: 1 (or lowest setting) or buttonhole stitch
You’ll be using a lot of thread for this, so make sure you have plenty.
5) Sew along the raw edges of the arm and neck holes. If you’re using a normal presser foot, the idea is to run the stitch right along the edge of the fabric, so the needle and the thread actually go off the edge of the fabric, thus wrapping thread around the raw edge and keeping it from fraying. An overstitch presser foot will do this on its own.
You’ll notice that this not only deals with the raw edges of fabric without any need for hemming, it also gives
them a nice scalloped effect. Neat, eh?
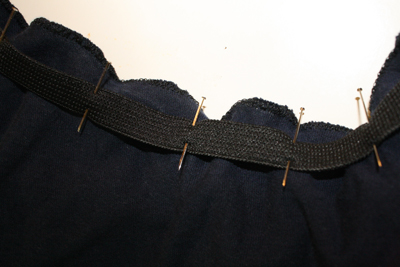
6) Once you’ve followed step 5 for all your raw edges, get out your elastic. Pin it to the inside of the shirt along the armholes and neckline, about 1/4 to 1/2 inch in from the edge. Pin frequently, and between each pin stretch the elastic out a bit so that it makes the fabric pucker. When you’ve pinned around the entire arm or neck hole, overlap the elastic slightly and then cut off the excess.
7) Sew your elastic down with a simple straight stitch. If you used “wider” (1/4 inch) elastic like I did, you may want to sew it down along both its inner and outer edge.
8) That’s it, that’s all there is to it. Wear your new shirt with pride and remember to look smug when your friends all show up wearing the same shirt, but yours is different. And better, of course.


Ruth
/ May 29, 2012Oh my gosh! I am so excited that I found this tutorial again! All hail the gods of Pinterest!! Someone had pinned your Weekend Confirmed mod and I found this from there.
I had seen this tute over a year ago and had decided that I wanted to try this with a few of my shirts, only to realize that I had somehow forgotten to bookmark it. Thank god I’ve found you again! :)
Tally
/ June 1, 2012Hooray! I’m so glad you found your way back here, and yay for Pinterest. :) Good luck with the shirt mods! If they turn out well and you want to share pictures, I’d love to post them in the Crafters’ Gallery: http://tallystreasury.com/crafters-gallery/
t shirt quotes
/ October 2, 2015I do trust all the ideas you’ve offered on your post.
They’re really convincing and can definitely work. Still,
the posts are very short for novices. May you please extend them
a bit from subsequent time? Thanks for the post.
Barabara Ruth
/ August 27, 2023I’ve had a few instances of items looking different in person than they did online – it’s a good lesson in handling expectations. Online Shopping