It’s road trip time! I am doing some in-a-van travelling with friends this week, piggybacking on their work trip to visit friends and family in the prairies. I’ve done lots of crafting on the road before, but it’s usually a bit of a pain trying to keep your small seat space tidy when you need to switch between scissors, pins, needle, thread, scissors again, etc. It would be nice to have a way to keep all those things easily at hand, but avoid having them spill all over the seat or get lost in car crevices or accidentally stab your seat neighbour.
I decided this is possible, you just need a sort of wall of pockets hanging beside you, where all your little crafting tools and supplies are right at hand and nicely secured. And probably the easiest way to do this is to hang it off the back of the seat in front of you.
This tutorial will give you the basic steps for creating a tidy little road trip crafting caddy, which you can customize and add to as you wish.
My friend Kathleen also pointed out that this sort of thing or a version thereof could be great for organizing your craft tools at home, too, especially in a small space. You could hang it in a closet or the back of a door, or on the wall. Could be great if you have limited crafting space at home (or if that space has to accommodate multiple uses) or in places like dorm rooms.
(This would probably make a good beginner sewing project; all the sewing is in straight lines, and its functionality matters more than whether it looks perfect and has perfectly straight seams, so it’s a good project to practice your sewing skills on. It uses – and thus teaches – some basic and very broadly applicable sewing techniques and tricks.)
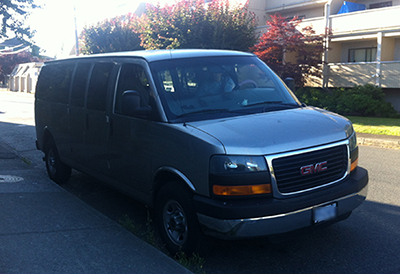
Our road trip party van! It’s huuuuuuuuuge.
———————————————–
Update: Ahahaha, so it turns out the giant van we’re borrowing for this road trip doesn’t really have seat backs that this can attach to – go figure. On the other hand, I can just rest it upright on the floor in front of me, and it’s still a super helpful way to keep everything available, organized and un-lost.
———————————————–
What you’ll need
materials:
- sturdy non-stretch fabric (cotton is good) – about 1/2 a yard should do
- thread to match your fabric(s)
- velcro – about 3/4 inch to an inch wide, a good 4-5 inch long piece of it
- two snap fasteners
- cereal box or other page-sized (ish) piece of cardboard
- cutting mat, ruler & rotary blade OR ruler, pen & scissors (basically, something with which to cut long straight lines through felt)
- straight pins
- scissors
- sewing machine
- chopstick
- iron & ironing board
- needle (for hand sewing)
———————————————–
Putting it all together
1) Start by cutting two page-sized (or slightly larger) rectangles of fabric. These can be cut from the same fabric or different ones – I was using up random scrap pieces with this project.
The exact size of these doesn’t matter, what matters is that you have a piece of cardboard that can be cut to a slightly smaller size than these rectangles. The cardboard will serve to give your craft caddy a flat and solid(ish) backing, which will help it hang nicely. You may also want to get a second piece of cardboard or a large, thin hard back book (like a hard-cover comic or a kid’s picture book), which you can pull out and use as a flat surface to work on in the car, sort of a lap desk.
2) On one long side of each rectangle, fold the fabric over by about 3/8 inch and iron it flat. Then do it again, so that the raw edge of the fabric is hidden. Pin it in place, and stitch it down.
3) Decide which rectangle is going to be the back of the caddy and which one will be the front. Set the front one aside and focus on the back one for the moment. Take the back rectangle and flip it so the folded-over edge is facing down, and is on the left-hand side.
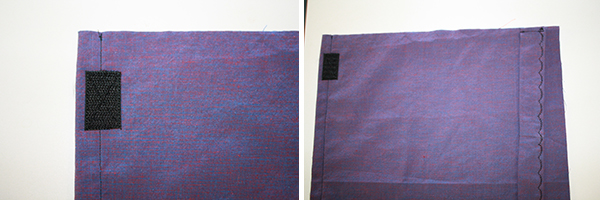
Cut a piece of velcro about 1 inch long. Take the prickly side and pin it to the top left corner of your fabric rectangle, about 3/4 inch away from the top edge, and 1/4 inch from the side edge. Sew it in place (sew along each edge of the velcro piece, then sew an X across the middle of it).
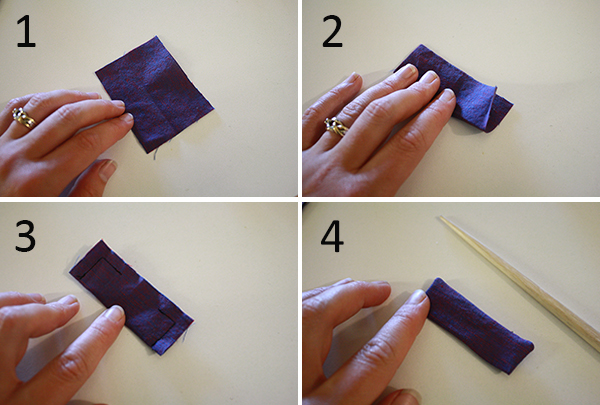
4) Next, you’re going to make a couple little tabs. Follow the steps below:
- Cut two small, short rectangles of fabric, probably about 2 to 2.5 inches wide.
- Fold each rectangle in half.
- Pin and stitch around the three open edges of each rectangle, leaving about a one inch gap in the middle of the rectangle’s long edge. Then trim the corners off of the rectangle, making sure not to cut through the thread.
- Using the 1 inch unsewn gap, turn each rectangle right side out. Use a chopstick to poke the corners out.
- Iron the rectangles flat.
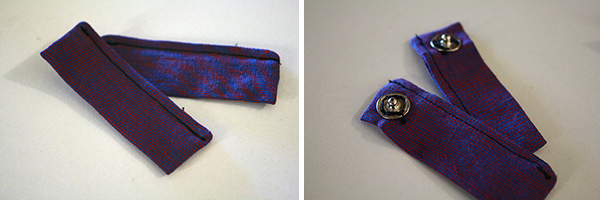
5) Sew a straight line across the long edge of each little rectangular tab where the opening is, about 1/8 inch from the edge of the fabric. That will close up the opening.
Then thread a needle and sew one half of a snap fastener to one end of each of the tabs.
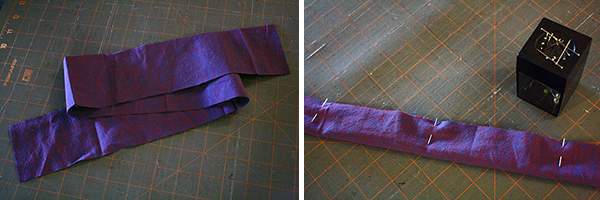
6) Cut one long and narrow rectangle of fabric, about 20 inches long and 3 inches wide. Do the same thing with this one that you did with the small tabs: fold it in half and pin it, then sew all the way along its three open edges, leaving about a 2 inch gap in the middle of its long edge.
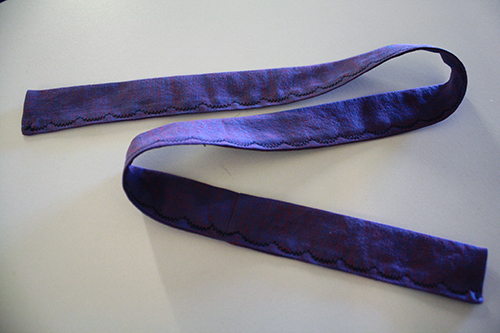
7) Turn the long rectangle right side out, using a chopstick to poke out the corners again. (As with the small tabs, you may want to trim those corners before turning the rectangle.) Iron the piece flat, then sew all the way along the straight edge where the gap is. You can just use a plain straight stitch for this – since it’s the strap for hanging the finished caddy, I decided to use a fancy little scalloped stitch just for decorative fun.
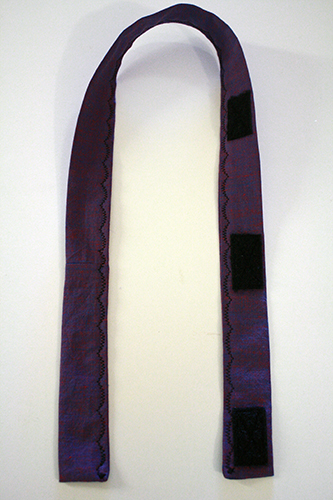
8) Now cut 2 to 3 more pieces of velcro, each about 1 inch long. Take only the soft, non-prickly sides and pin them to one end of the strap. Pin the first one to the very end of the strap, the next one about 2 inches up from that, and the next one (if you decided to do 3) about 2 inches up from that. Basically, this is allowing you some wiggle room for fitting the caddy around the headrest portion of the car seat, since car seat sizes and shapes vary. I don’t actually own a car, so I wanted to make something that could theoretically fit around whatever friend or family member’s car I might happen to find myself road tripping in at some point.
Stitch those velcro pieces in place.
9) Pin one end of the strap to the top right corner of the large fabric rectangle, about 3/4 inch from the edge. Sew it in place, about 1/4 inch from the edge of the fabric.
10) Now take those two little tabs with the snap fasteners on the ends, and pin one end (the end that doesn’t have the snap fastener) to the left hand edge of your large fabric rectangle.
Space the tabs out so one is towards the top of the rectangle and one is towards the bottom of it, about 3 or 4 inches from the top and bottom respectively, with a few inches between the two tabs.
Important: pin the tabs so that, as you look down at them, the snap fasteners on the other end are facing away, hidden from view.
Stitch the tabs into place.
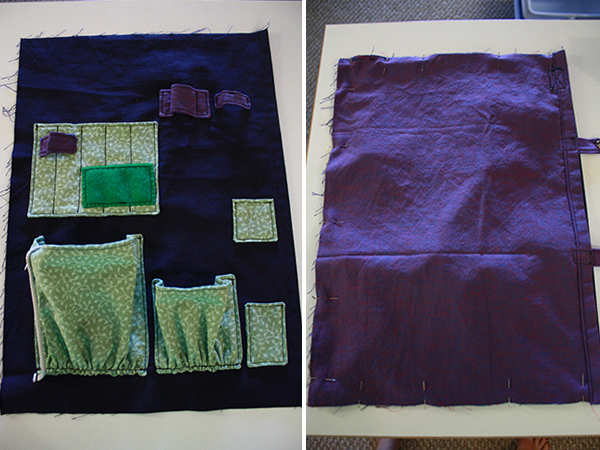
11) Set that piece aside for now, and grab the other fabric rectangle, the one that’s going to be the front of your caddy. This is where you figure out just what exactly you want this caddy to hold, and what sort of pockets and tabs and such you need it to have.
There are a couple different options for pockets: flat ones, which will hold objects that are not too bulky, and poofy ones, which stick out and have a much larger holding capacity.
Here’s how you do each of those.
12) Flat pockets:
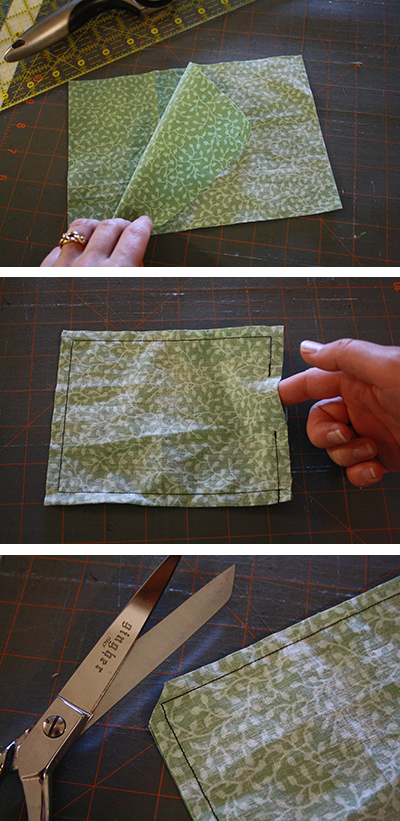
Basically the same process as the rectangle tabs you made in step 4. Cut 2 rectangles of fabric the same size, and pin them together, right sides facing each other.
Sew around the edges, leaving a 1 to 2 inch gap along one edge (whichever edge you want to be the top of the pocket).
Trim the corners off, being careful not to cut through the lines of thread.
Turn the whole thing inside out, iron it flat, and stitch a straight line along the edge with the gap in it.
Then pin the pocket onto your caddy rectangle wherever you’d like it to be, and sew around the side and bottom edges.
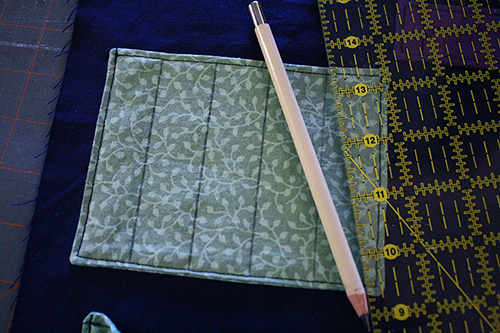
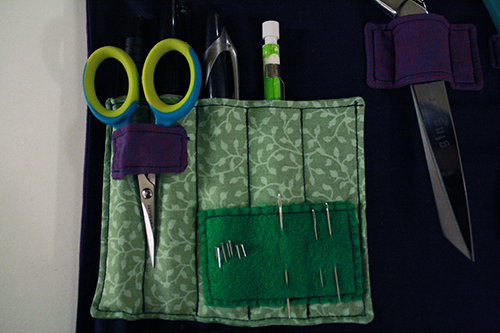
12b) If you want to make individual pockets for pens, pencils, markers and other similarly shaped objects, sew a pocket as described above. Then draw a series of vertical lines spaced out across the pocket, and stitch along those lines, forming individual slots to put pens and such into. I find that if you space the lines an inch apart, they’ll comfortably hold most pens, pencils and markers, including Sharpies.
13) Poofy pockets:
Start out the same way as for the flat pockets: cut your rectangles, sew them together and turn them right side out, iron them and stitch a line across the top edge.
Then, set your sewing machine to do a very long stitch, meaning that each stitch is as long/as big as possible. bottom edge of the pocket rectangle.
Sew a line of long stitches across the bottom edge of your pocket rectangle. DO NOT knot your thread at the start or end, and be sure to leave several inches of thread dangling at either end.
Now tie a knot in the dangling threads at one end, and trim them. Then, gently but firmly pull one of the threads dangling from the other end, which will cause the fabric to bunch up. Work these gathers along to the opposite end of the rectangle, then pull on the thread some more, etc., till it’s as gathered as you want and the gathers are evenly spread. Then knot this end of the threads and trim them.
There’s a chance, especially when you’re trying this for the first time, that you’ll pull to hard and break the thread. If that happens, just pull the whole line of stitches out with a seam ripper (should be very quick and easy, since the stitches are so big), and start over.
Now decide where on your caddy rectangle you want this pocket to go, and pin the bottom gathered edge in place, making sure it’s in a straight line. Sew in down.
Then pin each side of the pocket in place, so that it goes in a straight line up from the bottom edge. Sew the sides in place, and you’ll have a pocket that sticks out from your caddy and provides a much greater holding capacity. I put a couple of these on my caddy, for various project pieces or possibly so one of them could hold garbage – little felt trimmings and thread ends and that sort of thing.
14) Scissor tabs:
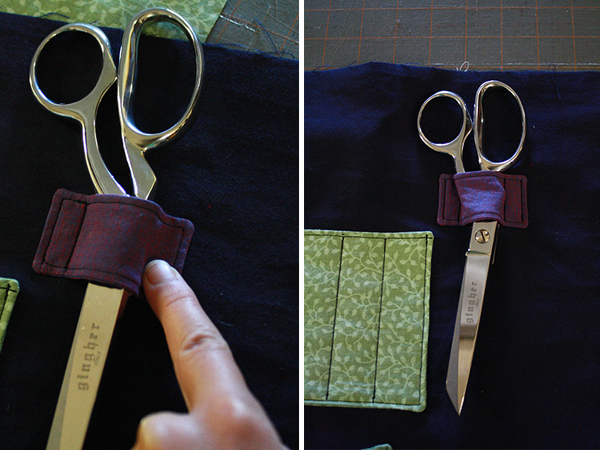
To make little tabs to slot things like scissors into, make a rectangular tab the same way you did in step 4, though you probably want to make it a bit wider.
Figure out where you want it to go, and stitch one side down. Then fit it over your scissors, so the tab bunches outwards, across the scissors. Pin the other end in place there, remove the scissors, and sew that remaining side of the tab down. Voila!
15) Thread holder:
To make a place to easily hold thread spools and bobbins, I cut a piece of cord that fits through the middle of the thread spools and bobbins, then sewed one end of it onto the caddy rectangle. I pinned the rest of it out of the way so it wouldn’t get stitched into a pocket or the edge of the caddy, and then, at the very end when the caddy was all pieced together, I hand stitched one end of a mini binder clip onto the front side of the caddy, so it can hold the loose end of the cord. This allows you to remove and change which thread spools you have on the caddy, but holds them securely in place.
16) Other tips and ideas:
- You can sew smaller pockets and tabs on top of other pockets to make more efficient use of space. You just need to make sure you sew the smaller pocket or tab to the larger pocket before you sew that larger pocket onto the caddy (or hand stitch them on carefully) so that they don’t ruin the functionality of the bigger pocket by being sewn right through it.
- Stitch a little patch of felt on as an easy place to store sewing needles and/or pins. (See image above.)
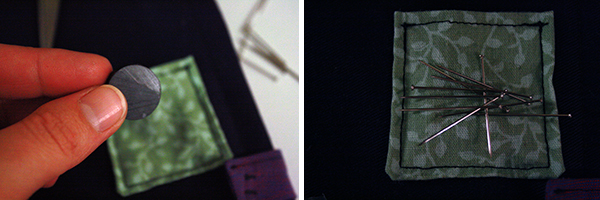
- Another pin storage idea: sew on a tiny pocket (make sure you use a thin fabric), and stick a little but strong magnet inside. Pins will stick to the outside of the fabric, keeping them easy to hand but not loose and not a poking hazard (and unlike having them in a little container on the seat beside you, this will keep them from going flying when you hit bumps in the road).
17) Once you’re sure you’ve attached all the pockets and tabs you want to, lay the front piece of the caddy down face up. Then take your back piece and put it down on top of the front piece, face down. Make sure the sides with the folded over edges match up, and that the long attachment strap is tucked in between the two pieces, away from the edges of the fabric.
Pin the two fabric pieces together, lining up all the edges. Pin them together on the three sides where there are raw edges, but NOT on the side with the folded over, hemmed edges and the little snap fastener tabs sticking out.
18) Sew those three sides together, using a 3/8 to 1/2 inch seam allowance. I recommend sewing along these edges twice, for extra strength. You can also do a seam finish (a zigzag stitch along the edge of the fabric) if you wish, though it’s not necessary. I did it because the fabrics I was using tended to fray quite a bit at the edges.
Trim the corners.
19) Turn the whole thing right side out. If you want, you can then flatten out the three sewn-together and pin them, then sew a line around them a gain, this time with the whole thing facing right side out. This basically helps it to stay flatter and keep its shape a little better.
20) Now grab the other two halves of those two snap fasteners, figure out where on the front of the caddy those fastener tabs will hit, and sew the other halves of the fasteners onto the appropriate spots.
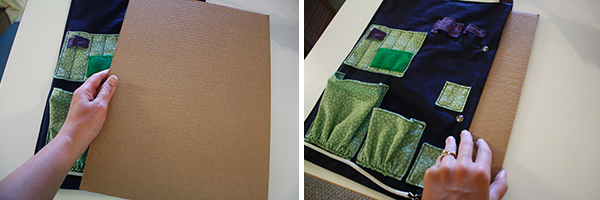
21) Insert your piece of cardboard between the two halves of the caddy, to keep it flat and straight. You can then also stick another piece of cardboard in there to pull out and use as a lap desk in the car, or also loose paper sheets, a notebook, sheets of felt or other fabrics, pattern pieces, etc.
Then fasten the snap fastener tabs over the opening to keep all that stuff from slipping out the side.
22) Now get out on the road and get crafting!


