Given that I do a craft tutorial every week, I frequently come up against the need to get rid of the things I make. There’s only so much room in our apartment, after all. Some items are sold, some are given away, some are enjoyed for a season and then thrown out or recycled.
I also have a habit of showing up at family dinners with the products of crafting projects – paper flowers, table place cards, random seasonal decorations, hair accessories, bookmarks – to be “gifted” to various relatives. I suppose it speaks highly of our families’ love for us (and their patience) that they keep inviting us back to these things.
This Easter, some lucky relative will have paper bunny napkin rings all over their table. They’re a cute holiday adornment, simple and quick to make, easy to recycle after dinner. And a reminder (via thoughts of the Easter bunny) of all the chocolate consumption we have to look forward to in the coming days. Yummmmmm.
——————————————
What you’ll need
- pretty paper (cardstock weight is best)
- paper scissors
- glue
- buttons or beads or pom poms or sequins, etc. (something to use as bunny noses)
- a pen or pencil
- bunny napkin rings template – number 14. under “Paper patterns and templates”
- [optional] white pom poms
——————————————
Putting it all together
…
1) Print out the bunny napkin rings template. Cut out the template and use it as your pattern.
You can, of course, also just print the template directly onto your nice paper.
…
2) Cut out your shapes.
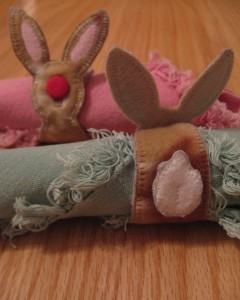
I tried this with felt, too, which is what that bunny on the right is cut from. I didn’t love the way it turned out in the end – too floppy. But I expect you could do some nice felt napkin rights like this if you double layered them, perhaps using the appliqué technique I explain in my sad panda mask tutorial.
Here’s what the felt bunny was looking like towards the end:
Ok, but floppy, and less “finished” looking than I’d like.
EDIT: My mom, after seeing this post, tried exactly what I described above, double layering felt (or fleece, in her case) with the sad panda mask appliqué technique, and here’s what it looked like. She also made a buttonhole on the face, so that the napkin ring can open up and be stored flat, and she did an appliquéd tail instead of using a pom pom:
…
3) Cut a small horizontal slit in the middle of the bunny’s face, using the tip of your scissors (or an exacto knife).
…
4) Take the “body” of the bunny (the long narrow rectangular bit that actuallylooks nothing at all like the body of a bunny) and bring the end of it around behind the bunny’s head. Insert the tip through the small slit you made in the bunny’s face.
Note: You might wonder why bother with cutting the slit and all, instead of just gluing the body’s end to the back of the bunny’s head (which you could certainly do). But I think pulling it through and gluing it to the front of the face makes the whole thing a little stronger, and less likely to pop apart when submitted to the pressure of having a napkin stuffed through it. This is especially helpful if you’re not using a particularly strong glue.
…
5) Fold the very tip of the paper down and glue it to the bunny’s face. Then glue a button or bead or other nose-like thing overtop of it. I decided to use little pink buttons because I somehow have a ton of them.
…
6) Add eyes and whiskers if desired, using markers or beads/buttons and and embroidery floss or pipe cleaners (for the whiskers). Add any other details desired.
…
7) If desired, glue a little white pom pom onto the back of the napkin ring, opposite the bunny’s face, to serve as a tail.
…
8) Gather all the family together and follow the fine holiday tradition of eating way too much good food. But within reason, of course. As my great grandfather used to say, “Never eat more than you can stuff down with all your might.”
Words to live by.


