I never liked cleaning my room as a kid, but I did like organizing it. In fact I’d usually procrastinate on actual cleaning in favour of organizing one small drawer or corner in fastidious detail. At one point in my teenage years I not only alphabetized all my books, I also put little numbered and lettered tags on the bottoms of their spines just like in a library.
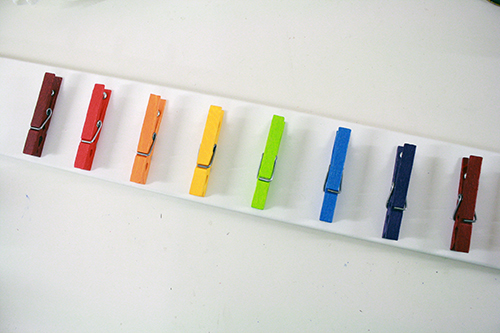
To this day, tidying and organizing gives me a sense of calm and accomplishment. So when I saw this idea for organizing tights and belts and scarves and other wardrobe bits and pieces, I desperately wanted to try it. Because I also own a lot of scarves and tights.
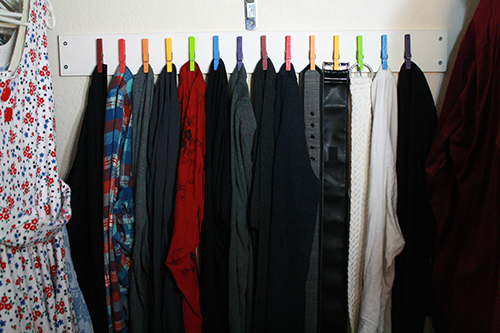
Not only is this storage method tidy and space efficient, it also won’t create poking-out warped spots in stretchy fabrics the way hooks often will, nor will hung-up items fall of of it easily the way they do off hooks. And it would be a wonderful organizer for a kids room as well, placed within their reach so they can learn to hang up and organize their own things.
Credit where credit is due: I did not come up with this wonderful idea myself. I saw a picture of this method of closet organization some months ago in my online craft perusals, and have been itching to try it ever since. Here’s the original post that inspired me, on the blog Lana Red. It’s a brilliant idea, and I wanted to modify it a bit for my own use. Instead of glue gunning the clothes pegs to the closet wall (which you probably shouldn’t do if you live in an apartment, and also I don’t have great faith in the durability of hot glue, and you really really shouldn’t use a more reliably permanent glue if you’re doing this in an apartment), I drilled them all into a piece of board, making it a more lasting piece of household equipment, and meaning that the only holes you need to make in the actual wall are the four to attach the board. Just like I did for my advent calendar & fake mantelpiece last year. Makes it easier to remove (and reattach) if you’re moving, or reorganizing the room or need to move it up the wall for a child who’s gotten taller.
———————————————–
What you’ll need
materials:
- wooden clothes pegs – and they need to be good quality, sturdy ones. I haven’t tried this with plastic clothes pegs, but I suppose if you can drill a tidy hole in them they might also work. You also must be able to take the clothes pegs apart.
- long narrow wooden board at least 1/2 inch thick
- small screws – narrow enough not to be so big that they’ll fit through the tops of the clothes pegs without cracking them, and short enough to hold the clothes pegs in the board but not go all the way through the board
- larger screws – sturdy enough and long enough to hold the board securely onto the wall using just two screws at each end of the board
- [optional] paint – for the wooden board, if you wish to paint it, and for your clothes pegs, if you wish to paint them
- drill
- drill bits in appropriate sizes for your screws
- screwdriver(s) that will fit the heads of your screws
- pencil
- ruler and/or tape measure
- small pliers
- old phone book or piece of thick scrap wood
———————————————–
Putting it all together
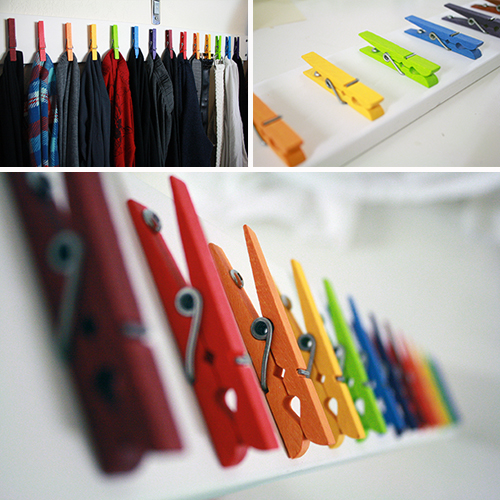
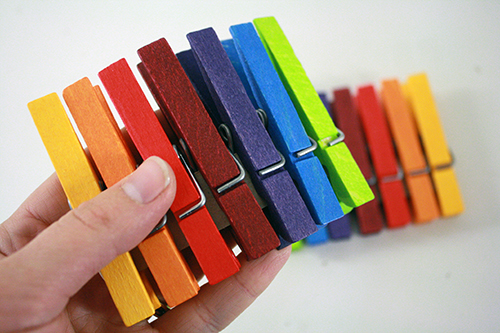
The first challenge with this project was actually finding decent wooden clothes pegs. I found some crummy ones that fall apart easily, but those were not going to do. This craft project rattled around my head for months before finally, while on my honeymoon, I spotted these wonderful coloured clothes pegs in the kids’ branch of a delightfully oddball store called Paxton Gate in the Mission in San Francisco. So if you live in San Francisco, I recommend going there. If you don’t, I don’t know what to advise except to look around at hardware and home decorating type stores or perhaps online. You do need good quality clothes pegs for this – made of wood that isn’t cheap and easily cracked, and with good quality hinges. And it’s a good idea to get a few more than you’ll need, in case any do break.
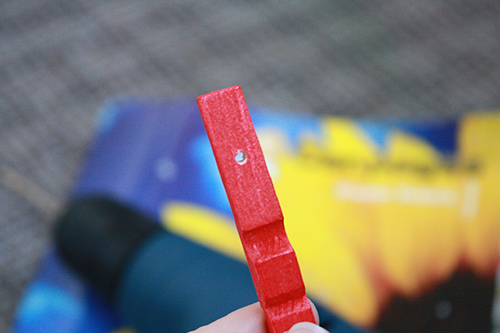
1) First, if you want to paint the board you’ll be attaching all your clothes pegs to, do so. It will probably need at least a couple coats. My board came pre-painted, which was helpful. You may want to do one final coat of paint later on as well, after drilling all the needed holes in your board. This will be helpful if you can’t get the pencil marks you’ll be making on your board to erase fully – a last light coat of paint will just cover them up instead. If you want, you could also paint the clothes pegs themselves. Just make sure you either paint around the metal bits, or take them fully apart first, removing the metal bits entirely, so that the paint won’t dry and glue the metal parts to the wooden parts of the pegs. This is important because you need to be able to take the clothes pegs apart (removing metal bits from wooden bits) to complete the rest of the project. 2) The next thing you’re going to do is take your clothes pegs apart. This is actually not so difficult. First twist the two halves of the clothes peg in opposite directions, so one half is starting to come off of the hinge. Then carefully slide the other end of that half of the clothes peg up and over to pull it completely away from the hinge and the other clothes peg half. 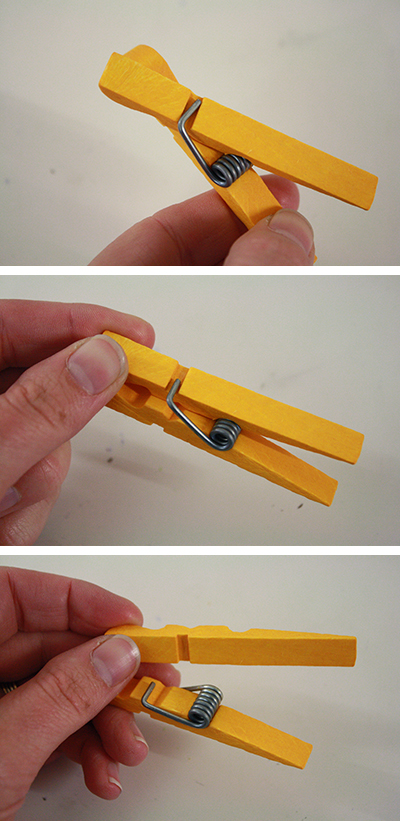 Continue until all your clothes pegs are detached in this manner. 3) Ditch the clothes peg halves with the metal hinge pieces attached for now, and take the other, just-plain-wood halves to a place where you can drill holes and make some sawdust. If you don’t have an official I-can-drill-holes-in-this worktable, you’ll need a piece of scrap wood or a phone book to put underneath your drill. Drill a hole in the top part of each clothes peg half, about halfway between the top of the clothes peg and the rounded indent where the metal hinge would usually rest. Keep in mind that your holes should be a little narrower than your screws, otherwise the screws will just slide right in without biting into the wood, which will render them entirely useless.
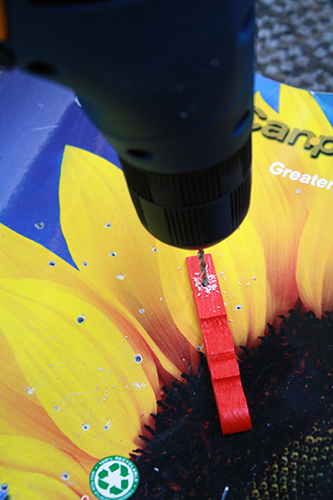
 You’ll notice in the pictures it looks like I’m being horribly irresponsible and drilling on carpet. I am drilling on carpet, but it’s crummy outdoor carpet that’s on our balcony, the quality and upkeep of which we very much do not care about. Tip: if you’re not sure what size of drill bit to use, do a test by drilling a hole into your phone book or piece of scrap wood, then try inserting one of your screws into it. This should tell you if you’re using the right size drill bit, or need a larger or smaller one.
 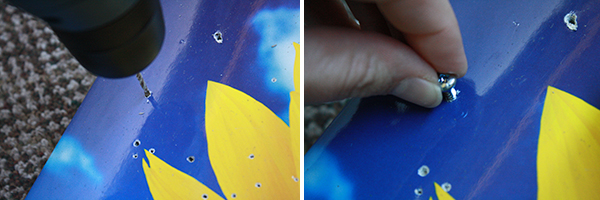 4) Now grab your piece of board. At either end of it, about an inch from the edge, make two evenly-spaced pencil marks. This is where you’ll drill holes for the screws that will attach the board itself to the wall.
 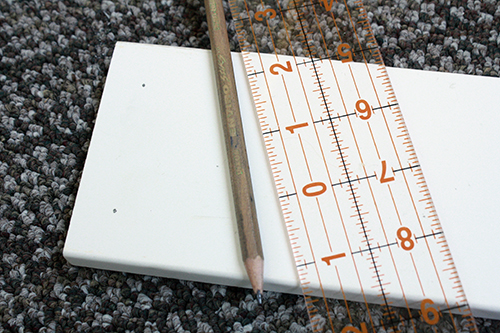 5) Use a ruler to draw a light pencil line all the way along the board. The line indicates the height at which the clothes pegs will be screwed to the board, so use the pegs halves with holes in them to determine exactly where on the board you want to make your line. Just make sure if the hole is right over the line, that the clothes peg is where you want it on the board.
 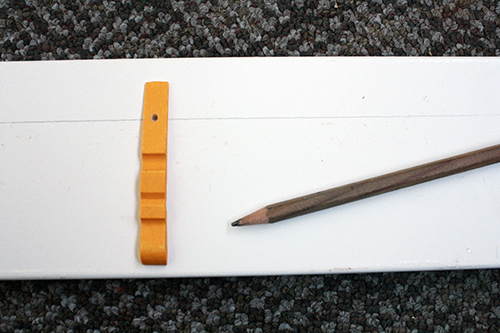 6) Now you need to do some math-y stuff based on how many clothes pegs you have and how long your board is, to determine how far apart each clothes peg will be. I recommend making room to space the clothes pegs out by at least 2 inches, or they’ll be too close together to hang clothing and accessories from each one very effectively. I spaced mine apart by precisely 2 inches. Use a ruler and pencil to make little marks along the horizontal line at the appropriate intervals. These marks are where you’ll drill the holes for each of your clothes pegs.
 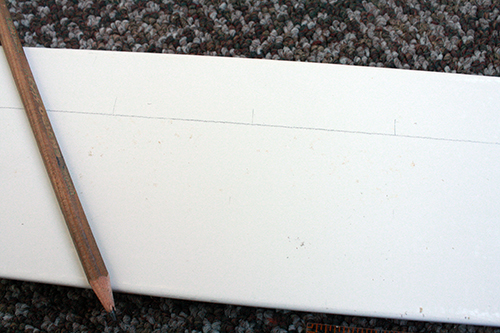 Once you’ve made all the marks, I recommend lining all your clothes pegs up over each of the marks just to get a quick visual and be sure you’ve spaced them out right, haven’t miscounted your clothes pegs and made to many or too few marks, etc. Make corrections to your markings if needed.
  7) Now drill a hole of appropriate size at each of those little marks you just made, where they intersect the horizontal line. You are, of course, going to use the same drill bit that you used to make the holes in the clothes pegs themselves.
 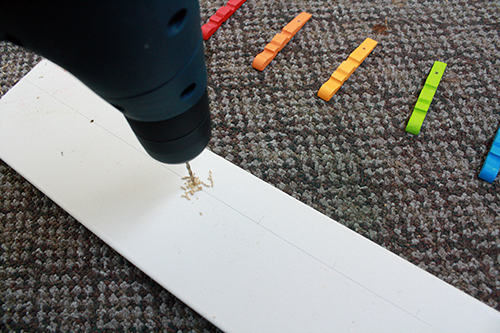 8) Now, using a different size drill bit if necessary (these longer screws may well be wider, too), drill holes at the two markings you made at either end of the board, where it will screw into the wall.
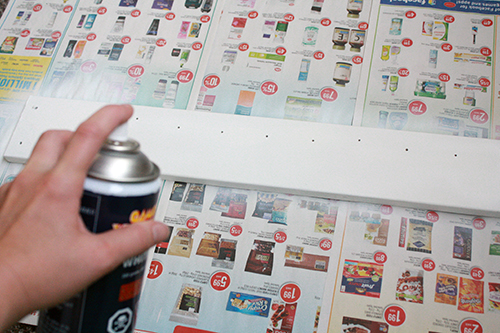
 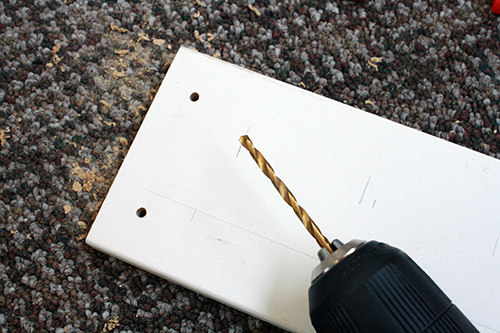 10) Erase all pencil marks and/or give the board one more coat of paint. One coat shouldn’t clog up your newly-made holes too badly, and if you use spray paint like I did, it won’t clog them up at all. Make sure you let it dry before moving on to the next steps.
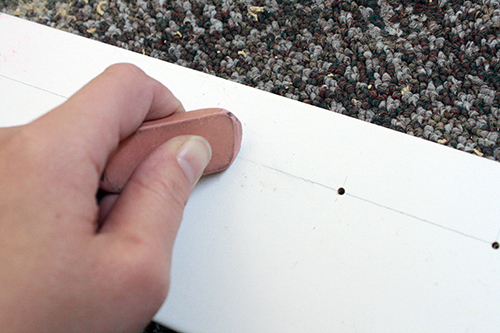
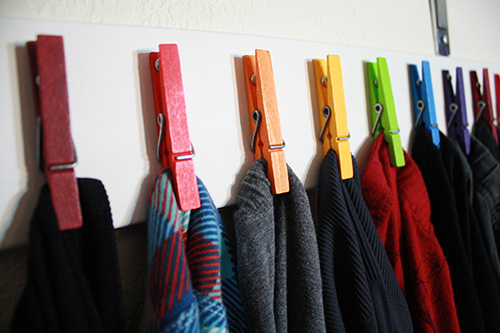
 11) Now you’ll need the other half of the clothes pegs again. Use a pair of pliers to pull up on the half of the hinge that needs to fit overtop of your drilled-through half of the clothes peg. Slide that drilled-through half under the hinge and in line with the other clothes peg half, so the clothes peg is all in one single, fully-functioning piece again.
  12) And now – I know this seems goofy but bear with me – turn the clothes peg over so the half with the hole drilled in it is on the bottom, facing away from you, and twist the two halves in opposite directions again, but don’t pull them completely apart this time.
 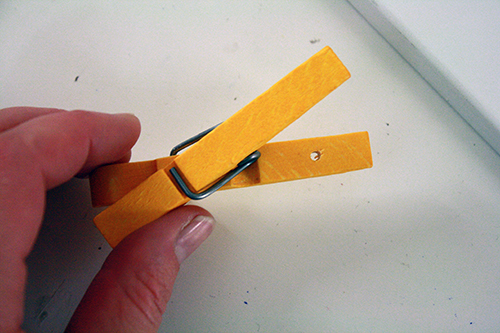 13) Now you lay the clothes peg hole-side down on the board, matching up the hole in the clothes peg with the one in the board, and screw it into place. Once it’s screwed tightly down, push the top half of the clothes peg back in line with the bottom half:
 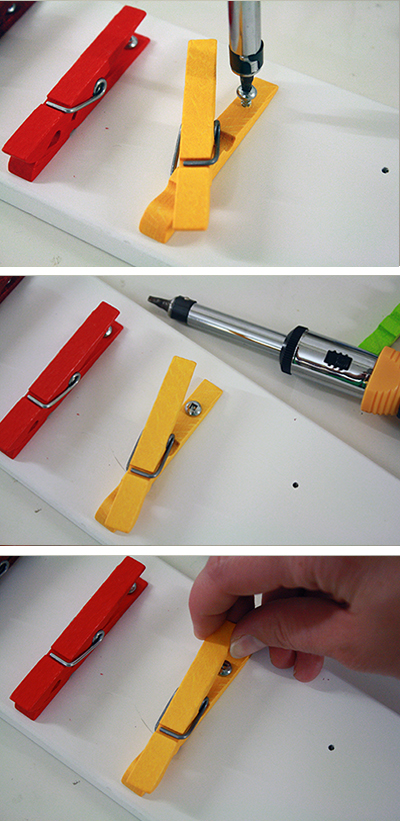 A quick tip: when you’re screwing in your clothes pegs, keep on hand firmly on the bottom of the clothes peg to keep it from twisting as you screw it in. The clothes peg can be straightened out at the end of course, but if it twists around the metal bit may leave a mark on the board beneath it. And the perfectionist in me doesn’t like that. Also go carefully when twisting the screws in that last bit to make them nice and tight. If you put too much pressure on you may crack a clothes peg. I only had this happen once, but it wasn’t a terribly huge crack – lucky since I didn’t have any spare clothes pegs. I pushed some sealant into the crack and hopefully it will hold alright over time. So far so good, anyway.
 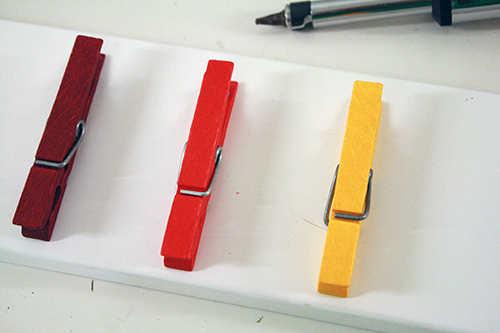 Lather, rinse, repeat until all the clothes pegs are back in one piece and attached to your board.
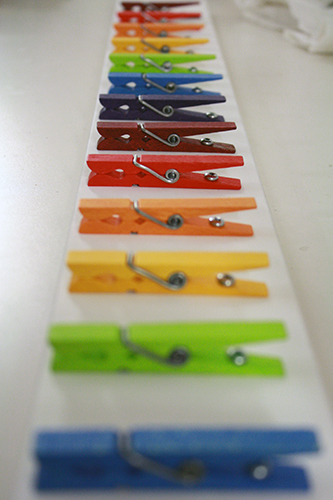
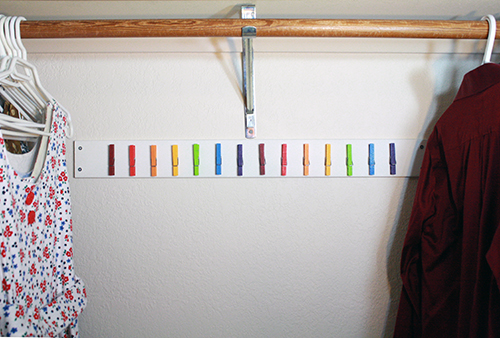
 14) Now you just need to hang up your clothes peg organizer! Hold your board up where you want it to go on the wall, mark through the attachment holes at each end to show you where to drill your holes in the wall, drill those holes, then secure the board in place. A tip: before you line it up to attach it to the wall, insert the screws all the way through the board so they’re just about to poke out the other side. Then match your board up to the right place on the wally and put the screws in the rest of the way.
 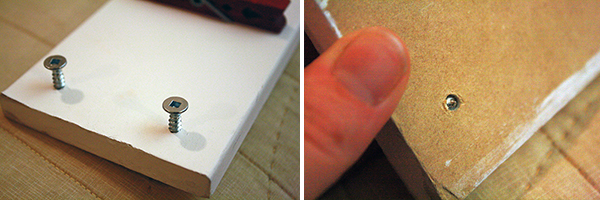 Though I’ll warn you, the whole mount-it-to-the-wall process, the last and supposedly very quick-and-easy part of this project, made me suddenly realize why home renovations always end up taking so much longer than they’re supposed to:
- First, you take the board and your tools to where you need them, in this case by the closet.
- Realize that you’ll have to remove a bunch of stuff from the closet in order to properly access the areas you need. Do this.
- Realize there’s no light in the closet, get lamp from other room and set it up, shining it into closet.
- Fiddle with board & struggle to hold it straight while marking where the drill holes should go, swear repeatedly and wish for 3rd arm. (True story: I learned many of my first swear words from listening to my dad do home renovations.) Mark the drill holes at one end of the board, your grip loosens and the board shifts before you can mark the holes at the other end. Swear some more.
- Get drill out and attach drill bit, plug drill in, go to make holes and realize drill cord doesn’t reach far enough.
- Search for extension cord: only one you can find is already in use in another room and requires moving furniture to get at. Do this.
- Plug drill in to extension cord, finally drill the holes at one end.
- Try to line board holes up with holes in the wall in order to mark drill holes at other end of board, fail, set everything down yet again to get bamboo skewers and rather ingeniously use them to poke through the holes at one end of the board and into the wall, lining things up and stabilizing the board while you mark the other holes, set it all down, grab drill and make other holes, grab board and line everything up again, prepare to screw it all into the wall, realize you left your screwdriver just out of reach on the bed. Shout for husband to come pass you that #$&*#! screwdriver. Etcetera, etcetera, etcetera until it’s finally all done.
TLDR: install the board in the closet or wherever you want it to go, and hang stuff up with it!