I recently got back in touch with an old junior high friend. No, that makes me sound more proactive than I truly am. She got in touch with me. Turns out she’s also into the whole writing scene, and has a rather entertaining blog called Wifeish.
If you suffer spring allergies from your local flora’s overly zestful pollenation, you might enjoy one of her recent posts. It’s a rant about all that damn tree sex and how it stuffs up the sinuses.
Which got me to thinking about trees this week. Unlike my old friend, I have no problem with large amounts of tree sex, since I miss out on all but very mild allergies. In fact, I revel in all that procreating greenery, since it does just that: creates greenery.
My friend also mentioned that she’s jealous of my living in Victoria, BC. Huh. The only good reason I could think of for that (as I contemplated our 6 months of gray rain, overinflated food and housing costs, lowest-in-the-country minimum wage and everyone else’s refusal to complain about these things with me, because BC is, y’know, “the best place on earth”) – as I say the only good reason I could think of to be truly jealous of life in Victoria is our cherry blossoms. Their blooming is one of my top 3 favourite events of the year (the others being Christmas and the not-guaranteed sometimes annual “heat” wave).
So I thought I’d do some crafting for my friend over at Wifeish. I have attempted to recreate a small measure of the cherry blossom’s beauty, without any of that nose-clogging pollen. And what did I use? My new favourite thing: felt!
What you will need:
-paper
-pen
-5 coins (all the same denomination)
-scissors
-felt
-needle and thread
-wire
-superglue (optional)
The Blossoms
1) Take 5 coins of the same denomination, arrange them in a flower shape, and trace them onto some thick paper. Now you have a basic flower template. Use dimes or pennies for a smaller flower, quarters or loonies (or American $1 coins if you can actually find 5 of them) for a larger flower.
2) Draw a small point onto the tip of each petal.
3) Cut out your template.
4) Find some white or pink felt (or whatever other colour you like). Use your template to trace several flowers onto the felt.
5) Cut out the felt flower shapes. Try to cut inside the pen lines so that the pen doesn’t show up on your finished product.
6) Make a small cut (about 1/4 inch) between each of the petals.
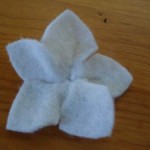
7) Take a flower, fold it in half.
8) Sew a few stitches down the middle of the flower.
9) Fold the flower in half the other direction and stitch down the middle that way. You’ve now added some depth and shape to your flower.
10) Repeat steps 6 – 10 with each flower shape.
[NOTE: It has occurred to me belatedly that you could likely get a similar depth effect by sewing a circle of loose stitches around the centre of the flower, then pulling it tight.]
The Branch
1) Lay out a piece of brown felt.
2) Cut 2 or 3 pieces of wire in varying lengths. Lay each one along an edge of a piece of brown felt.
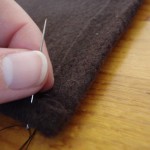
3) Sew the wire to the felt in 2 or 3 spots, just to keep it in place.
4) Fold the near edge of the felt over the wire, and glue it down. It doesn’t need to stay in place perfectly, it just needs to stay in place enough to make it easier for you to roll the felt over the wire once the glue is [relatively] dry. You can skip this step if you wish, it will just make the next step a little trickier. Or you can sew the folded-over felt in place over the wire.
5) Trim your felt (lengthwise) an inch or so from the wire.
6) Fold the felt over the two ends of the piece of wire, hiding the wire, and sew them in place with a couple quick stitches. When you’re done, don’t trim the thread. Knot it once or twice, then let it hang from the end of the felt.
7) Roll the felt into a tube around the wire.
8) Sew the felt into place. This is the trickiest bit. You’ll have to roll as you go, sewing the felt down, then rolling some more and holding it in place while you sew it down, etc. Luckily, felt is fairly malleable, and the darker colour should hide any little bumps or imperfections. Plus a real branch would have all kinds of little bumps and imperfections anyway.
9) Before sewing the main branch completely together, sew smaller felt branches into the opening, then roll and sew up the rest of the main branch around these smaller ones.
10) Bend branch into desired shape.
Putting it all together:
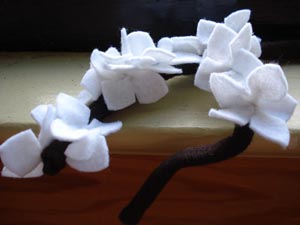
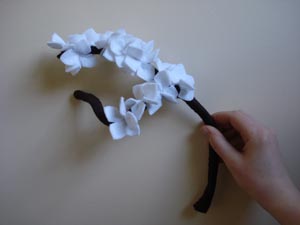
1) Sew the flowers onto the branch in an aesthetically pleasing array. Yup, that’s it.
Stay tuned for future photos – I haven’t quite finished sewing all the flowers onto this branch, so I’ll post more photos of the  completed project in the next day or so.
You can, of course, do other things with your little felt cherry blossoms. Attach them to a headband, a bracelet, a shirt. Use them as confetti. Sprinkle them through your underwear drawer. Or your boyfriend’s, and get a candid photo of his reaction. Mail them to someone who doesn’t have cherry blossoms, or is in one of those unfortunate places that has snow up to the windowsills till mid-May. (If you do that last one, don’t put your return address on the envelope.)

