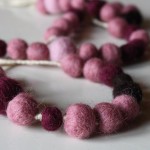
I love felt. It’s lightweight, it comes in every imaginable colour, it does not require hemming. It’s soft, it’s versatile, it’s inexpensive. And it brings back happy childhood memories. Who else out there remembers felt boards? Good stuff.
Felt is basically made by mashing a bunch of wool fibers together until they become one big mass. There are a couple different techniques for doing this, one involving hot soapy water and one involving sharp stabby needles. Each has its advantages, and today’s post will explain how to use each of these methods to make simple felt beads, leaving you to practice and then move on to make felted scale models of the Starship Enterprise, or whatever your preference may be.
Below are instructions for wet felting and needle felting. Wet felting tends to be a bit faster, but you have to wait for the felt to dry before using it. It’s also a great craft for kids to try. Needle felting has the advantage of being able to manipulate the wool into different shapes and add more fibers in order to enlarge and detail your felt object. However, it involves the danger of stabbing a very sharp, barbed needle through your finger. Definitely not for kids.
[Retroactive Note: I have just learned that merino wool is particularly amenable to wet felting, giving you a smoother result than other coarser fibers. Merino actually wet felts better than it needle felts, though you can still use it for either.]
Both of these felting techniques are hugely popular right now, as part of the general interest in getting back to old-school, earth-friendly, historically charged activities. Felt has been around since perhaps 6300 BC, and the process of wet felting pre-dates spinning, weaving and knitting. So get ready for some deeply historical, all-natural crafting while you read through these instructions on your iPad or laptop or ancient, historical iMac.
Wikipedia describes wet felting as a process “where the natural wool fibre is stimulated by friction and lubricated by moisture.” Sexy, huh? And it really is that simple – you’re just creating friction to get everything to knot together. Just like Bob from Accounting does at the office.
What You’ll Need
- wool rovings (these are bits of combed and carded wool that have otherwise been left un-processed. You can get wool rovings at some craft stores and many knitting and yarn stores. Here in Victoria we have a whole store dedicated to wool, and there are many places to buy wool rovings online. The most common and inexpensive is corriedale wool, which comes from New Zealand sheep. You can also use other fibers, such as silk. Rovings come dyed in just about every colour of the rainbow.)
- a dish or hand towel
- small bowl of cold water
- small bowl of hot soapy water (no special soaps needed – dish or liquid hand soap work just fine for this)
1) Lay out one of your towels with the two bowls of water on top. Divide your wool rovings into bits – different sized bits for different sized beads.
A couple quick notes here: it’s very difficult with wet felting to add more wool to an existing bead to make it bigger. So whatever size bead you get, that’s the size of bead you have. You can always try to compress it more to make it smaller.
Also, you do not need to cut wool rovings. Put one hand on the end of the roving, and the other hand several inches along the roving. Pull. It should come apart easily, and if it doesn’t, just move your hands a bit farther apart and try again. Then you can pull these pieces apart lengthwise to get smaller bundles of wool.
2) Roll a piece of roving into a tight ball and dip it in the hot soapy water, getting it wet through. Mash it between your fingers a bit without letting it out of it’s balled up form. Really make sure you wind the rovings as tightly as possible, and keep it tight throughout all these steps. This will give you a smoother, more uniform surface.
3) Roll the wool between the palms of your hands, pressing in hard. Same technique you’d use to form a ball of play-dough. Continue to do this for probably 30 seconds to a minute. Dip back into the soapy water as necessary. You want the felt to be wet and soapy, but not too soapy, or it won’t cling together. Some practice and experimenting will help you find the right balance. And I find the total time for making each bead is between 1 and 3 minutes, depending on the bead’s size and how much rolling it needs.
4) Dip the felt ball into the cold water and squeeze it to get cold water into all the fibers. Then squeeze the water out. This is shrinking the fibers and helping them hold together.
5) Set the bead down on the towel to dry, and continue making more beads. They’ll need to sit for 12 to 24 hours to dry out completely.
Needle Felting
What You’ll Need:
- wool rovings
- a foam pad about 4 to 6 inches across and 2-3 inches thick, or a couple pieces of thinner foam you can stack and tape together
- felting needles (Again, you can find these in some craft stores, in yarn and wool shops and in many sewing or fabric stores. They are longer than a normal needle, with a little tab at the top, and small notches in the bottom. They’re very sharp. And get at least two, because when you’re first trying out needle felting you’ll probably break a couple needles getting the feel for the technique.)
Notes: See my notes in the wet felting segment about how to divide wool rovings. You can also read my post on felted bacon bracelets for some more details on needle felting, and the idea of combining needle and wet felting techniques.
1) Depending on your foam, cut and stack and tape it together if needed to create a foam pad on which to do your needle felting. This protects the surface of your desk or table, keeps you from breaking your needle, and provides a surface with a bit of give, which you need for needle felting.
2) Roll some wool into a ball.
3) Holding it together, start stabbing it with the needle. Jab over the whole surface, evenly, to get all the fibers to stick together and take shape. Note that the more tightly you roll your rovings in the first place, the less stabbing work you’ll have to do. You’re also going to lose size here, so your unfelted rolled ball will shrink, probably by a quarter to a third of its original size.
THE #1 RULE OF NEEDLE FELTING: NEVER TAKE YOUR EYES OFF THE NEEDLE. Stabbing yourself through the finger with one of these is not fun. Trust me. It really really hurts. Don’t do it.
4) Continue. Seriously, that’s all there is to this. Stab all over until the felt is as compressed as possible (it can end up just about as hard as a marble, though much lighter, of course).
To shape an object, add felt or stab more in one area to compress it. For example, to make a strawberry, start by making a sphere. Then add more felt to one half and stab it down with the needle. On the other half of the sphere, do extra stabbing to compress the felt and make it smaller. Now you have a strawberry shape – tapered at one end and round and fat at the other.
So obviously you can make different shapes of beads using this technique – round, oval, squared, etc. Or berry-shaped.
Needle felting is mostly about practicing until you get a feel for manipulating the wool and getting the shapes you want. Start simple and work your way up to more complicated shapes.
Using your felt beads
As I mentioned earlier, felt is great because it’s so lightweight. You can make earrings, necklaces, bracelets, garlands, ornaments and more with your felt beads. Experiment and see what you can come up with.
Because these beads are felt, you can sew into them. So use one of those bead holer things (what the heck are they called, anyway??) to make holes in your beads, or just string some thread or yarn onto a needle and push it through your beads. Make really big beads and embroider on them, or sew little seed beads on. You can also sew felted objects onto other things, using them as the buttons or eyes on a plush object, or the head on a finger puppet or doll, etc. There are endless possibilities.
In the next few weeks I’ll be posting crafts that incorporate needle felting to make some part of the finished product. It’s a wonderful technique for using with a huge variety of projects.


