

Crafting isn’t always about making nice things from the ground up. Sometimes it’s simply about finding already-nice things and putting them to nice, new use.
Take buttons. They’re cute (as a button, of course), lightweight, colourful and come with tidy little holes for attaching them to stuff. They’re also small, which means you can have several hundred of them without realizing that you have several hundred of them, until one day you open up your button box and go, “Oh my gosh, how did I acquire several hundred buttons?” Science hasn’t proved it (yet), but I’m pretty certain that crafting supplies, especially buttons, procreate. I know I never bought this many.
Given that most of my clothing contains between 0 and 6 buttons, maximum, it will require some creativity to ever start using these up. So we’re going to make some jewelry. Button jewelry. Or jewellery, apparently. Despite being a citizen of the British Empire and even watching the Royal Wedding online, I only just learned that “jewellery” is in fact the British spelling of the word. Who knew?
The supply list for this project is ridiculously short, and is one of the extremely rare supply lists on this blog that does not include glue or scissors. Though of course you’ll still have glue and scissors around, since living without these items would be like living without running water.
This post also contains some of the utter basics of general jewelry-making, which you can of course apply to other non button-related projects.
——————————————————-
What you’ll need:
- buttons
- jump rings – of varying sizes, depending on your buttons. These are available at craft and bead stores, and sometimes even come in fun non-circular shapes, like squares and triangles.)
- two pairs of needle nosed pliers – if you have the jewelry-making pliers with flat, no-grip blades, or the round nosed ones (seen in my photos below), these are even better. The grippy ones (also seen in the photos below) can rough up your jump rings a bit. But really, for this project just use whatever you have around.
- other jewelry findings – eg: earring hooks, necklace clasps, etc., depending on what kind of jewelry you wish to make.

——————————————————-
Putting it all together:
1) Start by sorting through your buttons and making piles by colour, shape, size, etc. Then start pairing like or complimentary or whatever colours you like, and laying out possible designs.


A few things to keep in mind: large buttons will be difficult to use, as they’ll require large jump rings which may, in the end, stick out too much and look too awkward. Small buttons are easier because, ideally, you can fit two buttons onto one jump ring, connecting them. If the jump ring is too small for this or the buttons too large, you’ll have to use two or even three jump rings to connect the two buttons, which could make the piece of jewelry you’re constructing rather long and too focussed on the jump rings, rather than the actual buttons.

If you’re not sure whether or not something will work, try it. If it doesn’t turn out right you can take it apart and try something different.
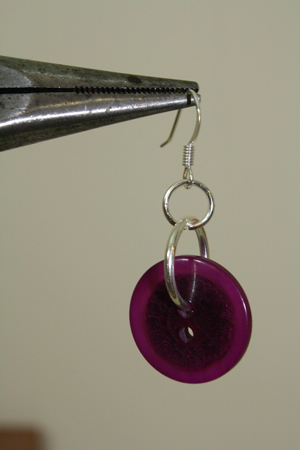
2) When you have a design ready and laid out, grab a jump ring and both sets of pliers. Find the break in the jump ring. Grip one side of this break with one pair of pliers, and the other side with the other pair.

3) Pull one set of pliers towards you, while pushing the other set away. This will open the jump ring, pulling its sides apart, but keeping its circular shape and thus making it easier to push it neatly closed again later.

4) Place the first button onto the jump ring.

5) Place the second button onto the jump ring. If the buttons have a right side and a wrong side (or an up side and a down side, if you prefer), make sure that alike sides are facing together on the ring, so that alike sides will be facing in the same direction once you close the ring.

6) Again, grip one half of the jump ring with one pair of pliers, and the other half with the second pair of pliers. Pull one side towards you and push the other one away from you to match the ends of the jump ring together and close the circle.


7) Open another jump ring and put it through the open end of one button.

8) Connect the next button to this jump ring, then close it. Or, if there is no next button, slip an earring hook, clasp or other desired jewelry finding onto it. Then close the ring.

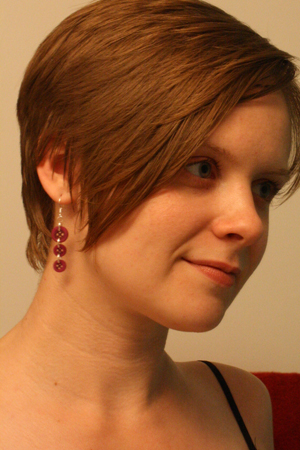
Keep it short to make an earring...

...or keep going and going to make a necklace.

Much of this is about experimenting and seeing what works. The buttons shown below looked nice together, but even using the largest jump ring I had, each two buttons overlapped at the edges and hung awkwardly, so I had to add more jump rings in to connect them. That got too long and there was too much jump ring relative to the amount of button showing. In the end, I decided to keep them super simple and just use the one big button. I think they looked better that way than what I’d first had planned anyway.


These clearish buttons also looked cute together, but the bottom one was too front-heavy and hung at an odd angle, though you can’t really see it in the picture. I decided they were a no-go. In this photo, though, you can see the possibility of connecting two larger buttons with two medium or large sized jump rings, plus one tiny connecting jump ring in the middle, to keep both buttons facing outward. You could also get an interesting effect by leaving out that middle connector and going back and forth with one button facing outward, the next facing sideways, and so on and so forth.

9) Ta da! You can make simple, one or two button earrings, or long chains of buttons for necklaces or bracelets. Anything at all, really. With the right buttons, it’s surprising how very elegant some buttons can look. Other buttons provide a more funky edge. They make fun little jingling noises, too. This is a very easy, inexpensive way to get some colourful, lightweight jewelry to match any outfit you wish.


