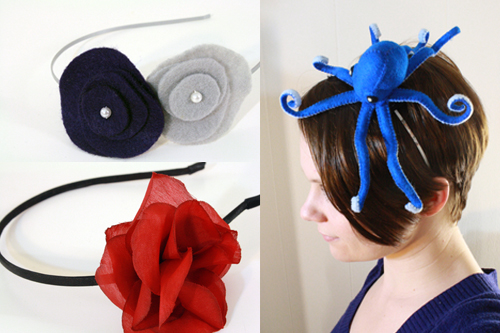
I’ve talked before about how headbands are cool – not anywhere near as cool as bowties or fezzes, but they’re still pretty nifty (and we’ll get to bowties and fezzes in later posts, I promise).
But as much as I like headbands, I don’t wear them often enough to need a whole army of them in my closet, and they’re sort of awkward to store. Once they’ve got flowers and bows and octopuses and such attached to them, they take up a surprising amount of space. So what you really need is one headband, with a bunch of different attachments for it. Like vacuums! If you had to have an whole different vacuum for the crevice tool and the dusting brush and the parquet tool and the main powerhead… well forget ever having closet space for anything else.
That’s the lesson for today: headbands are like vacuums. But simpler, because the easiest way to make a headband-with-attachments set is to apply a little velcro. The headband has velcro top, and each attachment has velcro on the bottom, and voila – attach a new decoration for any occasion. Even Octopus Day.
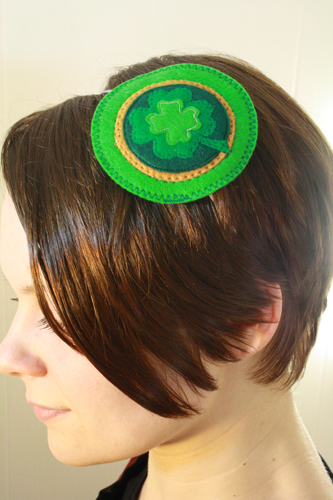
Last week I saw this darling St. Patty’s Day headband over on Craftzine.com, and thought I’d try one myself. It didn’t turn out nearly as cute as Melinda’s, but for a thrown-together-in-30-minutes piece it’s pretty wearable. Next time I’d try some of the embroidery and bead detail Melinda used, which I think looks really lovely. And of course I also forgot completely to wear my St. Patty’s Day headband on March 17th, because I was busy skiing and then sitting in a hot tub with booze in hand up at Mount Washington, but we can just say I’m super prepared for next year now.
A few tutorials for possible headband decorations:
- simple felt circle flowers
- paper flowers made from Magic or other playing cards (craft #6 in that post)
- stuffed felt monsters
- felt spiders (great for Halloween)
- cherry blossoms
- felt flowers
- poppies – felt or paper versions
——————————————
What you’ll need
materials:
- a headband
- a small piece of felt (a piece about 3″ x 3″ should be more than enough)
- velcro
- strong glue
- thread
- fabric scissors
- sewing machine (you can also hand sew the whole thing, but you’ll probably want a thimble to help you sew through the velcro by hand)
- hand sewing needle
——————————————
Putting it all together
1) Cut off a small piece of velcro. Exact size is up to you – I used a piece about 1 1/2 inches long and 3/4 inch wide.
2) There should be two sides to your velcro, one that is soft and fuzzy, and one that is more like beard stubble – stiff and scratchy. Put aside the fuzzy half of the velcro, and keep the scratchy half.
3) Set the scratchy half of the velcro down (scratchy side up) in one corner of your piece of felt, leaving about 1/4 inch edge of felt showing around the velcro. You can pin it in place if necessary – velcro is a pain to pin, so I didn’t bother in this case. Take it over to your sewing machine and sew the velcro into place.*
*Just sew all the way around the edges of the velcro – maybe sew around it twice for extra strength. When you’re sewing the soft, fuzzy side of velcro, you can also sew an X across its middle, but if you do that on the scratchy velcro piece the thread will just get caught in the velcro’s teeth and not be stitched properly in place, so it’s not really worth it.
4) When the velcro has been sewn to the felt, cut around the edges of the velcro that aren’t in the corner of the felt, so that you have a piece of velcro with 1/4 inch of felt around all its edges.
5) Lay this piece down on top of the remaining felt, using it to cut out a piece of felt exactly the same size and shape.
6) Flip piece of felt-with-velcro over so the back side with just the felt is showing, and put a thin line of glue along the middle of the felt.
7) Glue this onto the outside of the headband, at whatever point on the headband you want to attach your decorations.
8) Line the other piece of felt up with the first piece, but on the underside of the headband, so that the headband is sandwiched between the two pieces of felt.
9) Thread your needle, and sew around the outside of the two pieces of felt, stitching them together. Sew all the way around them, knot the thread and cut it.
Now you have a headband to which you can velcro on whatever decorative items you like! When making items to attach, just make sure they have a piece of fuzzy velcro attached to their bottom, like on my St. Patrick’s Day decoration. If the decoration is more 3 dimensional, and it’s difficult to machine sew velcro to its bottom, just sew a piece of velcro to a piece of felt, and then hand stitch the edges of the felt to the bottom of your decoration.
In the case of this St. Patty’s Day decoration, I simply sewed the velcro to the back of the big bottom green circle, and then sewed the smaller circles with the clovers in the middle onto that big circle, hiding the velcro stitching.
10) Wear with style, grace and/or tentacle love.


