• Categories

  • Archives

Assassin’s Creed 3 hood – this time it’s a full tutorial!

Remember several weeks ago when I posted about making an Assassin’s Creed 3 costume piece for a LoadingReadyRun video? The post where I was like, “this turned out so well, it totally wasn’t even that tricky to do, isn’t it awesome” and then didn’t include a tutorial. Cuz I’m a jerk. Well this week I’ve got the full tutorial and pattern for you, so you can just feel bad about calling me a jerk now. Even though I’m the one that did that. Huh, I kinda feel bad. I think this is working.

All the Assassin’s Creed hoods (the ones from the core games anyway – I haven’t looked carefully at the others) are the same essential shape, but they’re all constructed differently. Probably a deliberate choice on the game designer’s part just to make cosplayers’ lives that little bit more challenging. Thanks so much, guys. I haven’t actually tried create any of the other hoods, but from the images I looked at this is probably the easiest hood to put together in terms of construction and not having weird bunching/gathering issues. I hate bunching/gathering issues.

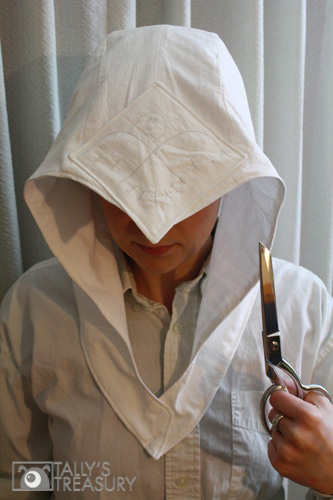
Don't screw with me. I will come for you with my expensive knife-edged sewing shears.

You can read more about the original reason for this project here, and the see the LoadingReadyRun video for which I made the original hood here. And see our friend Cam looking waaaay more badass in it than I do. Although I bet I could do some serious damage with those very expensive, very sharp sewing shears you see stuffed down my sleeve. I’m small, but I’m fierce. And I carry scissors. Which are possibly even more important than a towel.

 ——————————————

What you’ll need

materials:

  • white, non-stretch fabric, about 1 1/2 to 2 yards (Honestly, I have to guess at how much I used, because I just took as much fabric as I need from two white sheets – one sheet (the thicker one) served as the hood’s exterior, and the other as the lining. I definitely recommend using cotton though, especially if you are actually going to cosplay with this, or wear it for any length of time. At any convention or sweaty costume party, you will be so much happier if your costume is made of fabrics that can actually breathe. The people standing near you will probably be a lot happier, too.)
  • white thread
  • two medium sized snap fasteners OR about 1 1/2 inches of white velcro
tools:
  • sewing machine
  • sewing scissors
  • straight pins
  • chopstick
  • sewing needle
  • iron & ironing board
  • pencil (a fabric pencil is best, if you have one – if not just use a normal pencil)
  • scotch tape
  • Assassin’s Creed 3 hood pattern – number 13. under “Sewing Patterns” (be sure to get Parts 1 AND 2!)

——————————————

Putting it all together

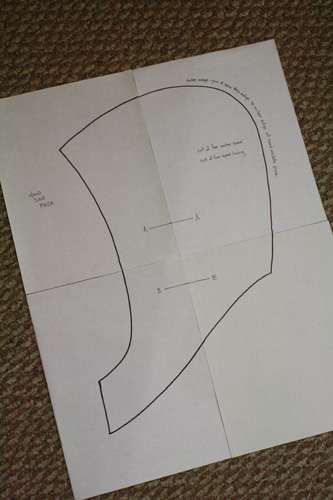
1) Start by printing out the pattern (both parts!) Part 1 and part 2 are each four pages, and will need to be taped together. On part 1, match up the 4 pieces of paper using the A—A and B—B lines to show you which edges connect to which other edges. Or just, y’know, look at the pieces and figure it out. On part 2, just use the first 3 pages, matching them up edge A to edge A and edge B to edge B. Set aside the fourth page (with the diamond and the eagle) for now.

Tape the appropriate papers together. Do not worry about margins and stuff, even if your printer (and it will) cuts off the printing on the edges of the paper so the lines don’t go all the way to the edge. Just match up the pieces of paper and all will be well.

Then cut out the pattern pieces from each set of taped-together papers. Where there are gaps in the lines because of printing margins, just follow the obvious place where the line should be till you get to the end of the gap and the continuation of the printed line. That was confusing as all hell. I trust that you can figure this out though – it’s just common sense, really.


2) Now you will pin your pattern pieces (which the ones in the picture look nothing like because they are the original drafts on butcher paper, rather than printed and taped-together patterns) to your fabric. Stack your fabric so you have FOUR layers of fabric in total: two layers of the lining fabric, and two layers of the outer hood fabric. If you’re using the same fabric for the lining and the outer hood*, just make sure you have four layers of that fabric. All flat, one on top of the other.

If your fabric is all wrinkled (like mine was), you should iron it first (like I didn’t – learn from my foolish mistakes).

Do this with the Hood Side piece and the Hood Middle piece.

*I fully recommend this – there’s no big reason not to use the same fabric for both. I just didn’t have quite enough left of either of my white sheets to do this with, so the remainder of one sheet became the lining, and the remainder of the other sheet (which was a nicer quality cloth) became the hood’s exterior.


3) You should now have four copies of the Hood Side piece (two for the lining, two for the exterior) and four copies of the Hood Middle piece (two for the lining, two for the exterior).

3b) See on the Hood Middle Piece pattern how there are two little dots along the pattern edge at one end? Make two little pencil marks at that same place on one of the Hood Middle pieces. Doesn’t matter which of the four pieces, just choose one.

Then set aside the Hood Side pieces for now, and match two of your Hood Middle pieces together. Pin them along their straight edge. Do the same thing with the other two Hood Middle pieces.


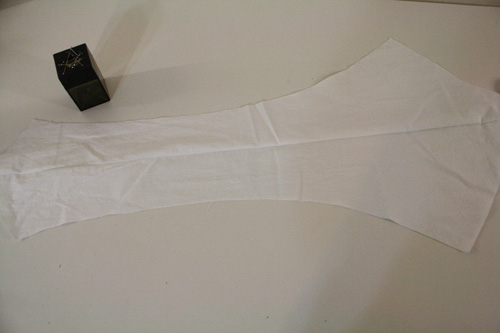
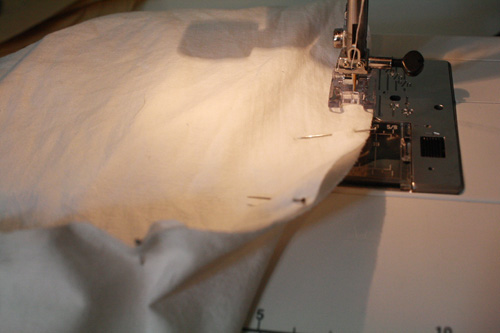
4) Sew along these edges, using a 3/8 inch seam allowance (in other words, just keep the edge of the fabric matched up with the edge of the presserfoot while sewing).

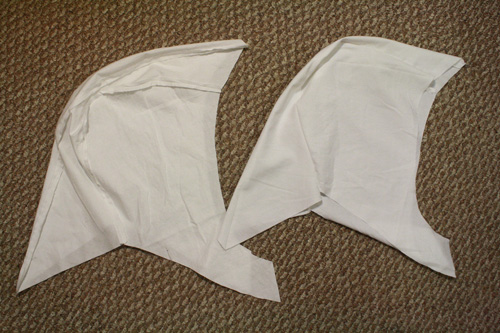
You should now have two pieces that look like this:


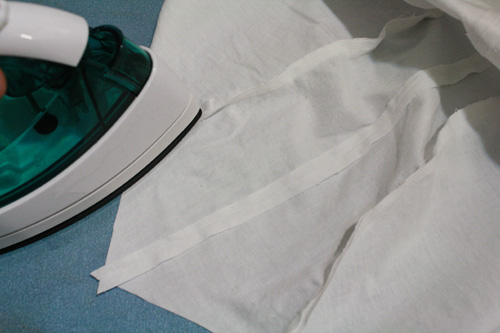
5) Open up each piece and press the middle seam flat.


6) Now, pair each sewn-together Hood Middle piece up with two of the Hood Side pieces. If you’re using different fabrics for the lining and the exterior, make sure the exterior fabric Hood Side pieces are paired with the exterior fabric Middle piece, and same with the lining.

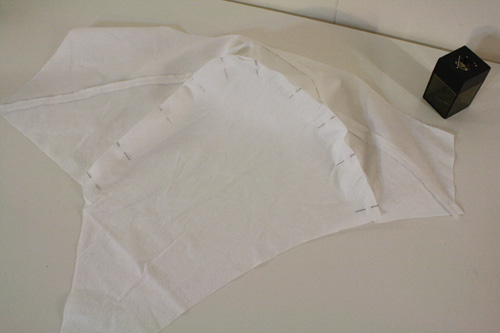
Pin the curved edge of one Hood Side piece to the curved, outside edge of the Middle piece, making sure that their right sides are facing each other (so the seam of the Middle piece should be facing out towards you). Important note: the wider end of the Middle piece is the bottom and back of the hood.


7) Now stitch those pieces together along the pinned edge, again with a 3/8 seam allowance.


8) Pin the other Hood Side piece to the other side of the Middle piece, and sew them together. You will now have the basic hood, looking about the right shape and everything.

Give those new seams a bit of a pressing, at least at the ends – it gets a bit tricky to iron them down all the way along the middle of the hood, because the shape is so rounded.


9) Repeat steps 6-8 with the other Hood Side and Hood Middle pieces. You should now have two identical (except maybe for the fabric) hood shapes.


10) Leave one of the hoods inside out (seams showing), and turn the other hood right side out. Tuck the right side out hood into the inside out hood, so that the right sides of the two hoods are together. 


11) Match the hoods up at the front and back points and all the seams, pinning them there. Then pin the hoods together all the way around.

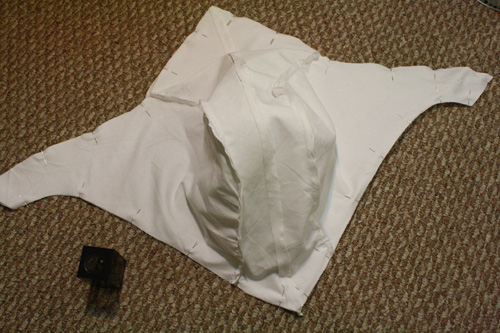
EXCEPT, remember those little pencil marks you made along the edge of one of the Hood Middle pieces? Find those, and put two pins in the fabric right next to each other at those marks. You’re going to leave the space between those double pins open and unsewn, so that you can turn the whole hood right side out.


12) Start at one of the double pin marks, and sew all the way around the hood till you get to the other double pin mark. Us a 3/8 inch seam allowance as before.


13) [Optional but helpful] Use the very tips of your scissors to cut a series of small lines from the edge of the fabric up to (but not through!) the seam line in those parts of the hood where the line curves significantly. Also, snip the pointy ends off all the corners (again being sure not to cut through the thread).


14) Using that gap you left between the layers, turn the whole thing right side out.


15) Push the lining layer of fabric inside the exterior, so the whole thing looks like a hood and not an empty balloon.


16) Use the pointy end of a chopstick inserted through the gap between layers to (gently!) push out all the corners. Then, at the edges of the hood, pull and roll the fabric a bit between your fingers, till both layers are pulled out right to the point where they’re stitched together. Did that make any sense at all? Basically, you want a totally smooth edge, and you don’t want a bunch of fabric still tucked up inside the hood. Pin along the edge as you go. When you get to the gap, just make sure the raw edges are tucked inside and evenly matched up, and pin the gap closed. 
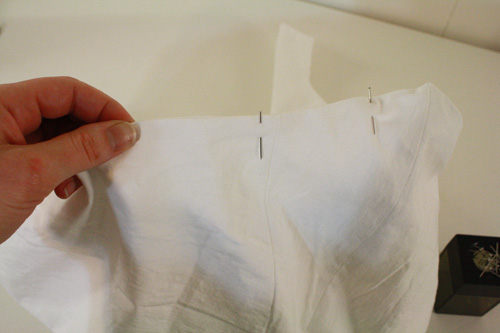
 

17) Sew along the entire edge of the hood, stitching the gap closed and keeping the edges of the hood in place. This time, use about a 1/8 inch seam allowance. See the open space in the middle of your presserfoot? What I do is just match the edge of the fabric up with the edge of that space, and that’s about the right seam allowance.


18) Excellent, the main part of the hood is done! Now to add that eagle-embossed triangle at the front. Grab page 4 from part 2 of the pattern. Cut out the diamond shape, pin it to a double layer of fabric, and cut it out, so you have two of those diamond-shaped pieces of fabric. Again, maybe iron your fabric first. I really really should have. It’s easier to work with, especially if you’re drawing eagles onto it. Make two little pencil marks on one of the fabric diamonds, in the same place you see those two little dots along the edge of the pattern piece.


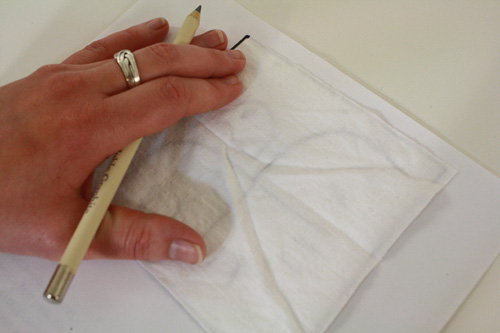
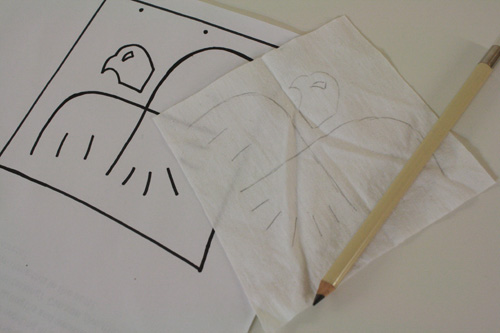
19) To add the detail of the eagle (which is not strictly necessary, but is a nice bit of attention to detail), place one of the fabric diamonds back overtop of the pattern piece. Then, using a pencil (a special fabric pencil is ideal, since its marks will thoroughly disappear in the wash), trace over the lines of the eagle. If you’re having trouble seeing those lines, pin the fabric to the pattern and hold it up against a window to do the tracing.


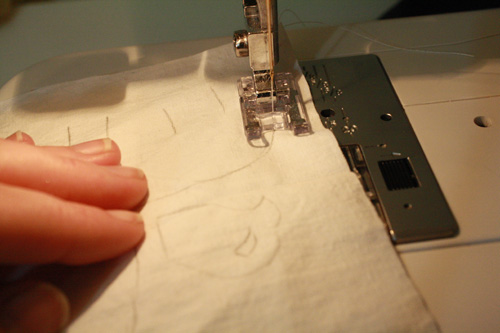
20) Now (and this is the somewhat tedious part), stitch over each of those lines. You probably want to go over each line two or three times. To get it to show up a little more, maybe use off-white thread, or put gray thread in just your bobbin, or use white and gray as your top threads (on most sewing machines, you can use two top threads at a time – just load them one beside the other onto the thread holder thingy and thread both of them through the machine together).  Or, if you want to skip the finicky stitching, you could use a small paintbrush and some off white fabric paint to add this detail. Puff paint would probably work. It’s supposed to be pretty subtle, and ideally won’t show up a ton.


21) Now place your eagle-embellished diamond on top of the other diamond and pin them together, right sides facing each other. Put a double pin at each of the little pencil marks you made along the edge of one of the diamonds, and do not sew that bit together.

Note: I actually decided to let the pencil-lined side of my eagle be the “right” side, that would be seen on the finished hood. The pencil lines, mostly covered by the thread, made the eagle show up a little more – though they will probably come out entirely in the wash – and even when one is careful, the upward-facing side of anything being sewn with a machine tends to be at least a little tidier than the reverse side.


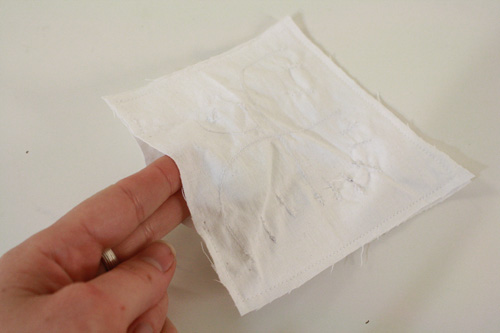
22) Starting at one double pin spot, sew around the diamond till you get to the other double pin spot (1/8 inch seam allowance here). You should then have a piece like this, with a little gap in one side:


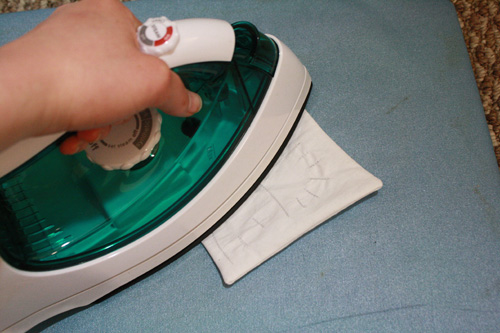
23) Use the gap to turn the piece right side out, poke the corners out gently with a chopstick, and do that thing with the edges to get them all nice and flat and pulled out. Tuck the raw edges in at the gap, and pin the gap closed. Then give the piece a quick ironing.


24) Pin the diamond to the front of the hood piece, making sure it is centered. Let the very bottom tip of the diamond overhang the actual hood fabric slightly.


25) Stitch around the edges of the diamond, again with a 1/8 inch seam allowance.


26) Sew some snap fasteners (or a bit of velcro) to the front bottom flaps of the hood to close it. And finally, especially if you used cotton, you probably want to give the whole thing a good ironing.


27) Destroy your enemies! Or just, y’know, pose for badass photos at the next convention you attend.


And on the topic of hoods, if you’re into dressing up as something a little more huggable (or need a really simple, two-piece pattern hood tutorial for some other project), try this post.


Share
Leave a comment

69 Comments

  1. Tony

     /  May 1, 2012

    Thank you so much! I needed to do a sewing project for a class and people were doing shorts and skirts. I think I will have a bit more fun with this.

    Reply
    • Tally

       /  May 1, 2012

      Love it, Tony! I hope it turns out well and is the envy of all your “Gosh, all I made was these shorts” classmates. :D

      Reply
  2. Nick

     /  July 10, 2012

    thanks so much for your research and work! i have a suit i have never worn that i was trying to brainstorm into chopping up and re-creating as something i’d actually wear. i am using your pattern/tutorial to create an assassin’s creed inspired hood for my trenchcoat, as i don’t like to wear hats. plus i am a geek, so it is a win-win. love your blog.

    Reply
  3. Amy

     /  August 5, 2012

    Your tutorial was so easy to follow! You made an awesome pattern and my hood looks great thanks to you. Tally, you are a crafting rock star.

    Reply
    • Tally

       /  August 5, 2012

      Whooo, always wanted to be a rock star! I think this means I should go get at least one crazy piercing somewhere super uncomfortable, right? :)

      Srsly though, so glad it turned out well for you! Delighted to have been of help. :)

      Reply
  4. Marshall

     /  October 9, 2012

    THANK YOU THANK YOU THANK YOU!!!!!!! FINALLY!!!! I’ve been looking for a tutorial like this FOREVER!!! You are the greatest person ever!!!!!!! I am going to use this for Halloween and attach it to my jacket….I’m a complete nerd btw. So nbd. Nerds r hipsters nowadays :P

    Reply
    • Tally

       /  October 9, 2012

      Yay! You just made my day – I love hearing that any of my tutorials have helped with someone’s project. Enjoy your new hooded Halloween jacket! :)

      Reply
  5. Stephanie

     /  October 18, 2012

    Thank You!! My son is working on a Connor costume for the midnight release and this was exactly what we needed for the hood. Your instructions and patterns were so clear and easy to use and the finished product is perfect. I have a very happy son and that makes me a happy mama. :) Thanks again!

    Reply
    • Tally

       /  October 18, 2012

      So pleased to hear that this was helpful, Stephanie! Glad that you found my instructions and pattern easy to use. Good luck with the rest of the costume – I hope it turns out great! :)

      Reply
  6. Rocío

     /  November 2, 2012

    Thank you very much for the pattern and tutorial. It was incredibly clear and the hood came up nicely.
    I do believe, however, that your next tutorial should include instructions on how to convince your boyfriend that no matter how much he loved the hood, he should take it off once in a while, and that he cannot use it at work ;) I’m only having problems with that

    Reply
    • Tally

       /  November 5, 2012

      LOL. I dunno, I think it’s not necessarily my fault that you did such an awesome job of making it that he won’t take it off! ;D Really glad the pattern and tutorial were helpful and that your boyfriend likes the result so much. Thanks for commenting!

      Reply
  7. Mandy

     /  November 13, 2012

    Oh my goodness! Thank you so much for this pattern & tutorial. My son has begged for this costume and I was hoping to find a pattern somewhere. I can’t wait to make this for him as a Christmas gift! Thanks again!

    Reply
  8. Anonymous

     /  December 6, 2012

    hey, i am doing a project and i am making a miniature Connor’s costume (assassin’s creed 3 costume) Do you think you could give me a hint on how to make the hood the right size? I have a wooden dummy to put the clothes on.

    Reply
    • Tally

       /  December 10, 2012

      Well it kind of depends on just how miniature, but what I’d do is basically recreate all the pattern shapes but smaller, so use the pattern I’ve posted as a reference to get the shapes of each of the pieces right. Or you could print the actual pattern pages out at a shrunken size. If you’re doing a really small version (say, Barbie sized or thereabouts), you’ll want to use smaller seam allowances, and you’ll really want to make sure you use a thin, lightweight fabric, or possibly skip creating an inside lining and just do a one-fabric-layer hood (you’d just have to do a double-folded hem all the way around).

      Reply
  9. Sarah

     /  December 18, 2012

    thank you sooo much for this!! we are going to give it a go as my little boys decided to ask Santa (6 days before xmas!!!) for an assasins creed costume!!! :((( ! well santa is only going to have time for a hood!!! thank you, you are a lifesaver!

    Reply
    • Tally

       /  December 18, 2012

      Yay, I’m so glad this helps out! Best of luck to you, er, Santa, that is, with the construction. :) I hope your boys enjoy it! (Note that you’ll definitely want to downsize the pattern for kids’ heads – the hood is quite large.)

      Reply
  10. Natalie

     /  January 11, 2013

    Started making this a few days ago for Halloween/cosplay

    Reply
  11. DeadBread

     /  January 16, 2013

    hey.cool thing,but there s a question.how can u dye your hood?yh i know that u can buy diffrent cloth but i cant mark it.good day to ya and ty for the tutorial.

    Reply
  12. Max

     /  March 13, 2013

    O_O

    Thank you! XD I’m a really bad sower but have wanted to make my own hood. I’m probably just going to mod a new (Cheap) hoodie but your patterns and using the needles to hold everything together is perfect!

    You are rather awesome. Keep up the good work!

    Reply
  13. Alkistis

     /  April 4, 2013

    Thank you so much! It was easy it was fun and this is the result:

    http://sphotos-a.ak.fbcdn.net/hphotos-ak-ash4/484840_10200386155430441_236777165_n.jpg

    THANKS TALLY YOU ROCK!!

    Reply
    • Tally

       /  April 4, 2013

      Thanks! And you’re totally welcome! So glad it helped you out. And your complete costume looks awesome!!

      Reply
  14. tin

     /  May 2, 2013

    i really need help making the symbol, is there any way i could do it

    Reply
    • Tally

       /  May 31, 2013

      Hey, I’m sorry I didn’t see your comment right away. If you can be more specific as to what exactly you’re having trouble with on the symbol, I can try to offer some advice.

      Reply
  15. BB

     /  May 16, 2013

    you simply ROCK!! Just completed a full Connor coat from scratch…I have been stumped on the hood…thank you, thank you, thank you and my 10 yr old grandson will thank you as well…this is his 10th birthday gift and now, its really going to be complete!! Peace & Love

    Reply
  16. Kar

     /  June 4, 2013

    Thank you for the wonderful tutorial!!! ive been making an assassins creed outfit out of leather and was at a lost for the hood! your pattern here was perfect for the stiff leather im using.

    Thank you THANK YOU!!! :)

    *hugs*

    Reply
    • Tally

       /  June 13, 2013

      Hooray, I’m so glad it was helpful for you!! :) I bet this hood looks amazing in leather.

      Reply
  17. Laura

     /  June 6, 2013

    Thank you so much. I’ve been wanting to make this costume for a while. Great tutorial. Easy for a teen to use :)

    Reply
    • Tally

       /  June 13, 2013

      Yay! Thanks for stopping by and checking this post out! Glad this was helpful. :)

      Reply
  18. Jinx Wayion

     /  June 12, 2013

    Oh may gosh! Thank you so much. This was just so helpful and the fact you actually put up the patterns you used was just awesome. Everyone who makes stuff and just says ‘this is the same you cut up’ doesn’t get how hard that it to actually do. I really can’t tell you how awesome you are ^ ^ two thumbs way, way up~

    Reply
    • Tally

       /  June 13, 2013

      Yay, so glad it was helpful! I too have a pet peeve regarding “tutorials” that are just some vague half-instructions and not enough pictures, or no actual pattern, etc. I try really hard to make my tutorials clear and understandable and easy to use, so I’m very glad to hear it’s working. :)

      Thanks for stopping by!

      Reply
  19. Connor Kenway

     /  June 16, 2013

    Dude, your hood sucks. It’s way too wide. Here’s a tip try using wires.

    Reply
    • Tally

       /  July 22, 2013

      And your tone sucks. However, you have a point that using wires might not be a bad idea. You could try putting them along the top middle seams of the hood, between the fabric layers, to help the whole thing hold its shape more firmly, especially when wearing it around all day at a convention or something.

      Thanks so much for the tip! Now you just need to work on your presentation. ;)

      Reply
  20. J

     /  August 13, 2013

    Very nice tutorial Tally.
    I have a few questions to ask about this hood and tips about the Creed coustume if you have time to converse through via email when ever you have time.

    Reply
    • Tally

       /  October 8, 2013

      Certainly, sorry for the late late reply! If you want you can send an email to tally[at]tallystreasury[dot]com. :)

      Reply
  21. Lauren

     /  August 14, 2013

    Question – do you have any advice about using fabrics other than cotton? Say, velvet and a satin-feeling lining?

    Using scraps from a dress from when I was 8. Plenty of fabric, so that’s not an issue, and I’ve worked with it before on other projects. Just wondering if it might effect the process?

    Thanks so much by the way! This was perfect for my competent sewer skills, but not so competent sewer vocabulary. :D

    Reply
    • Tally

       /  October 8, 2013

      Hi Lauren,

      I’m so sorry, it may be too late for a response to be useful to you now! I would think though that it would work fine, it’s just that some other fabrics may be a little annoying to work with (satins do that slippery sliding-around thing of course) and may be more delicate, so you don’t want to make mistakes and have to pick out stitches as it could damage the fabric.

      Fabrics like velvets would probably make the hood a little thicker, which could be a good thing as it would have a little more body to it and hold its shape a little better.

      And I’m really glad the tutorial writing was clear and helpful for you! I really try for that. :)

      Reply
  22. Kim

     /  September 10, 2013

    Hi there. You did a GREAT tutorial for this, THANK YOU for taking the time to do it!! Now we’re anxiously awaiting the one for the coat. Before this weekend please? Haha. Just kidding.

    Reply
    • Tally

       /  October 8, 2013

      Ahaha, I’ll have to work on that. Maybe for NEXT September. ;) And you’re welcome for the tutorial – I’m so glad it was helpful for you!

      Reply
  23. Alicia

     /  October 15, 2013

    thanks so much this pattern REALLY has come in handy as I’ve made two AC cospieces.

    Reply
  24. Pam

     /  October 18, 2013

    Thank You, Thank You, my grandson wants to be Connor for Halloween and I had no idea where to even start. I had never heard of Assassin’s Creed until about a week ago. Hopefully we can pull this off in just 2 weeks. Thank you also for the great tutorial and very good directions.

    Reply
  25. Pam

     /  October 18, 2013

    I noticed someone wanted a pattern for the coat. What we are going to attemp to do for my 11 year old grandson is take a man’s white dress shirt. Cut off the front bottom so it will fit him right then turn the back into tails. We are going to be adding blue to it just not sure how yet. But I can sew and my daughter in law can draw so we should be good. Hopefully we can get my grandson to stand still long enough to fit it to him.

    Reply
  26. Sherri

     /  October 29, 2013

    You are awesome. Thanks so much for providing this pattern. My son wanted a last-minute AC costume and I had no idea what the heck to do. You’ve saved me so much time. And I like the way you handle meanies =)

    Reply
  27. Kris

     /  October 29, 2013

    Thanks for the pattern. I’ve always had issues visualizing in 3D and my first hood attempt on my own was a fail. Then I used your pattern & voila the mock up turned out great as did the real hood. I used 2 shades of red thread to create the eagle (the hood is off white) and it really pops. 2 days, 2 second hand coats, several used zippers later and my nephew’s costume is ‘close enough’ to quote him.

    Reply
  28. Tressa

     /  November 2, 2013

    You are bad ass! Made this hood for my son for Halloween, it turned out rad. Your tutorial is simple, honest and entertaining. Thank you for sharing your skills.

    Reply
  29. Rob

     /  February 17, 2014

    Thank you so much for posting this! Yes, your pattern it is still in use, even now :-) . I made a couple for my kids and their friends so they could film a movie, and the hoods were a wonderful addition to their film, or so they tell me. Held up with all their stunts and fighting. Are you going to post a vest or jacket design? Thanks for all your hard work, keep it up!

    Reply
  30. Lauren

     /  February 27, 2014

    Hello there! This is amazingly well done. I have a question, however; would there be anyway to make something like this with a hoodie that I already own? I made it sleeveless, so I have some of the matching fabrics to go with it.

    Reply
  31. Jessica

     /  April 6, 2014

    thanks for the tutorial..im re-tweaking your pattern to replace the collar on a pirate shirt. a friend requested that I make him a pirate shirt with an assassins creed hood for Renaissance fair. making the shirt and hood from black linen and replacing the eagel with a skull and crossbones.wish me luck….lol

    Reply
  32. Helen

     /  May 7, 2014

    This is brilliant. thank you! I’m creating an Egyptian Assassin so I needed a hood pattern I could modify.

    Reply
  33. Thank you so much for this tutorial. I made two for my step-grandsons and they loved it. Check out my website where I posted a picture of the completed project. Again, thanks for the wonderful tutorial.

    Reply
  34. Kristin

     /  October 27, 2014

    Thanks so much for posting this tutorial. My 12 yr. old son wanted to do something like this for halloween this year & thanks to you he was able to sew this hood almost by himself! He is just thrilled with the results (I am too)! He decided to use some red thread for the eagle and it looks great. Thanks so much!

    Reply
  35. Amy

     /  June 9, 2015

    Thanks for the great pattern. It fit perfectly. I used a linen-poly blend and it was beautiful. My friend has an embroidery machine and we embroidered the emblem in red on the front patch. Wish we could send you a photo. Thanks again!

    Reply
  36. evan davis

     /  June 15, 2015

    you are amazing!!! Thank you so much

    Reply
  37. Peter

     /  June 30, 2015

    Greetings. Smashing job on the hood there. I have a pair of old urban camo combat trousers that I am looking to turn into a hybrid of a long drop elf hood, and an assassins creed hood. Do you have any hints and tips for someone who is going completely off the reservation in terms of intended end result?

    Reply
  38. Lisa

     /  September 26, 2015

    Thanks for generously sharing!

    Reply
  39. Laura

     /  November 1, 2015

    I used your pattern to make my son’s assasins creed hood which brought it all together and me me the best mommy in the world. Thank you! I did make a few changes! I used red for the lining layer. I am not sure if you had a printout for the patterns, I drew it on the fabric by hand. The side pieces turned out OK but I made the middle piece a bit too short, but I fixed it easily enough, I just cut a piece of fabric that matched the width of the two middle pieces seen together and then sewed them to the two halves of the original middle piece. It made me realize that if I did this project again, I would cut the middle piece from a folded over piece of fabric, thus eliminating the need to sew it together. I t also give it a cleaner line for the top of the hood.

    Reply
  40. Ash

     /  November 3, 2015

    Hello!

    Could you please help me? I`ve got a drawing of the hood I`d like to do but I have absolutely no experience in sewing =( I`d like to try and make one (sure I`ll be able to do it after thorugh trial and error) but I can`t get my mind around the pattern of it. Maybe you could deconstruct it for me? Please contact me through [email protected], I`d be much appreciate for any help

    Reply
  41. Why do people make the hoods so big and floppy it isnt supposed to look like a potato sack with a point that goes out 4 feet to touch your nose. It is supposed to be tight and the point is supposed to be stiff and stubby. I hate it when i see people dress up when it looks that bad.

    Reply
  42. tony

     /  October 15, 2016

    Will give this a try have made the rest of outfit, got stuck with the old brain on hood. And not wanting to waste material thought i would try to find a template. Let you know how it went in when printed and sewn.

    Reply
  43. melgun

     /  April 10, 2020

    where ı find hood template

    Reply
  44. Oreo

     /  March 29, 2023

    I know this is a really old tutorial but thank you for putting the time and effort to make this tutorial!!! I used this as a guide to make a hood for my black suit moon knight cosplay since his hood is very similar to the assassin’s creed hood!! I used black fabric for my interior lining and it worked out perfectly!! Thanks again!! <3

    Reply
  45. The capability to monitor my package’s trip gives me a feeling of exhilaration as it gets closer
    to delivery. Best sellers 2023 products

    Reply
  1. Assassin’s Creed 3 hood – bonus post | Tally's Treasury
  2. Assassins Creed Outfit | MatildaMakesDesigns

Leave a Reply

Your email address will not be published. Required fields are marked *