 I’ve recently been inventing all sorts of little projects to use up my fabric scraps (so that I’ll be allowed to acquire more fabric scraps, of course). I get the feeling that this is a pursuit I’m going to have all the rest of my days, unless I suddenly stop sewing. Y’know, if Hell freezes over. Which is what I once said it would take to get me to start sewing, so I guess you just never know. Or maybe Hell has frequent thermostat problems and has frozen over on multiple occasions in the last few years. Could explain a lot.
Regardless, I’ve come to realize that I will probably be surrounded by an abundance of fabric scraps for the rest of my days. In fact, if I’m one of those weird old ladies who dies in her own apartment, that’s probably how they’ll find me – buried under an avalanche of fabric scraps, brought down on my head when I was innocently reaching for the glue gun. Tragic. Bridget Jones thinks she’ll be eaten by Alsations, pretty sure The Bloggess mentions being consumed by cats (I just finished her book, which you should totally read – it’s wonderfully, horrifically funny, and often surreal in the extreme), but I will be suffocated by cotton prints and polyester blends. If there are any members of the animal kingdom to blame, it’ll have to be moths. They’ll surely find some wool scraps or something to munch on in my funereal fabric pile, and probably take a bite out of me accidentally just because. If it’s possible to be eaten by moths, I’m sure it’ll happen to me.
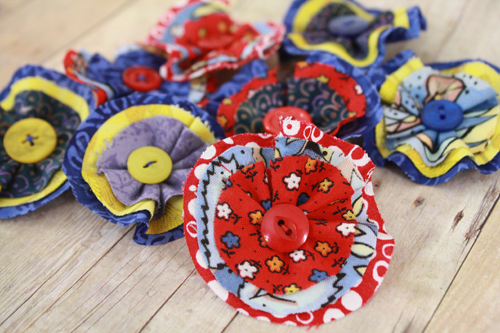
Surprising as it may be, the point of this post was actually not to contemplate tragic apartment death scenarios, but to talk about making cute little flowers out of fabric scraps. It’s super easy, and if you make enough of them it may help lessen the chance of you being buried by your own fabric stash. I’ve made a whole bunch that I think I’ll turn into a flowery wreath so I can tell which apartment door is mine and stop accidentally trying to unlock other people’s doors (so awkward).
——————————————
What you’ll need
materials:
- fabric scraps – the more colourful, the better!
- thread – maybe in colours that match your fabric scraps, maybe in colours that contrast with it. Up to you.
- bobby pins, pin backs, hair clips, velcro, snap fasteners or any other kind of fastener to put on the back of your flower in order to attach it to things. Or just sew your flower to a headband or shirt or whatever.
- buttons or beads or something else to put in the middle of your flower
- round things to trace, in various sizes – like cups bowls, jars or lids, spools of thread… it all depends on how large you want your flowers to be, too
- fabric scissors
- pen
- sewing needle
- [optional] sewing machine – this is to do a zigzag stitch around the edges, which will help your fabric fray less and the flower last better. OR you can just put some fraycheck or clear nail polish around the fabric edges to keep it from fraying.
——————————————
Putting it all together
1) Using the jars or lids or whatever round objects you’ve rounded (haha) up, trace different sizes of circles onto your fabric scraps. You’ll want two or three (or even more) circles for each flower, and you can make the circles for each flower all the same colour, or different colours. For each flower, use circles of at least a couple different sizes.
2) Cut out the circles, cutting just inside the pen lines (so that they don’t show up on the finished flowers).
3) [Optional] Sew a very close-together zigzag stitch all the way around the edge of each circle. Or dab fraycheck or clear nail polish around the edge of each circle. This will keep the fabric from fraying a bunch (though it will actually cause the edges to fray more initially, and then will stop them from going further), and whether or not you want to do this step probably depends on:
- how exactly you want the flower to look (the zigzag stitching is a particular look, plain fabric gives a particular look that varies depending on the type of fabric and wether/how/how much it frays on its own, nail polish gives a particular look, especially if you use coloured nail polish instead of clear – you get the idea)
- what kind of fabric you’re using (and whether it even does fray, and if so whether it does it in a nice, aesthetically pleasing way, or a totally messy & unappealing way)
- whether you want to put the flower on something you’ll have to put through the laundry a lot (like a shirt), b/c that will exacerbate fraying, which, if fraying is what you want, could be cool, but if fraying is not what you want then you’ll probably want to do something about the circle edges
- how much time you want to spend on this (which probably also relates to how many flowers you’re wanting to make), since the stitching around the edges does add a bit of time, which adds up to a lot of time if you’re wanting to make more than just a few flowers
4) Stack a bunch of different sized circles on top of each other – however many you want to use for your flower. You can stack the circles straight on top of each other, or stack them unevenly, like I did with the purple flower below. I decided I prefer the stacked straight look in the end, myself, but both ways work.
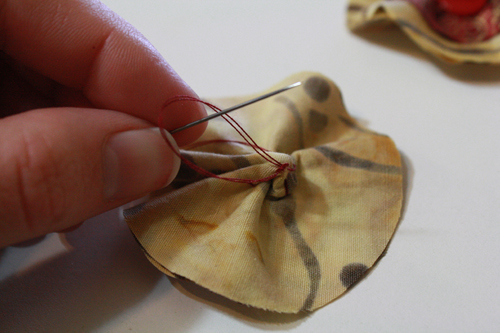
5) Thread your needle and knot your thread. Using big, widely spaced stitches, sew a circle, stitching through all the stacked pieces of fabric. This circle of thread should be about halfway to two thirds of the way towards the center of the smallest fabric circle. DO NOT knot and cut the thread when you’ve completed the circle!
6) Pull gently but firmly on the thread, so that the fabric circles pucker up. Manipulate the fabrics so that their right sides are puckering inwards. When the fabric is sufficiently puckered (you decide what that means for you), knot the thread. DON’T cut it yet, though. The flower will be pretty puckered up at this point – that’s ok.

7) Turn the flower over and flatten it out a bit, pulling the front open.

8) Choose a button or bead, then poke your needle and thread up through the middle of the flower from the bottom. Thread the button or bead onto the needle, then stitch back down through the flower. Lather, rinse, repeat until the button/bead is sewn on firmly, then knot the thread and NOW you can cut it.
9) Sew a bobby pin, pin backing, barrette, clip, or other fastener onto the bottom of your flower. Then attach it to stuff to make the stuff look pretty!


