

And I’m back! Things are finally going to get back on schedule around here, starting off with an actual, honest-to-goodness full crafting tutorial! About time.
Today’s post is about celebrating birthdays, but don’t worry, all you who are waiting for more about weddings. I have several posts in the works about the wedding, from the dress (and the last minute emergency mod of it, oh wasn’t that an adventure!), to the flowers and decorations, to just what all those crayons (I bought 25 boxes of crayons) were for, to the actual whole bit where oh my gosh we got married! It’s all coming. Our photographer is working tirelessly on getting all the photos processed so I can show you these many glorious things. But you can’t rush good work, so while we wait, it’s birthday time.
Just after our return from a glorious San Francisco honeymoon, a friend of ours had a birthday. He invited us out for a celebratory dinner, and I decided to start back into my crafting by making a little something to mark this special occasion. To make sure everyone at the restaurant knew just who the birthday boy was.
So happy birthday to our friend Johnny! Here’s how you can make a similarly embarassing awe-inspiring crown for your own pal.

———————————————–
What you’ll need
materials:
- felt in beige/brown/other cake colour, white (or another colour for the cake icing), yellow (for the candle flames), and whatever colour(s) you want the candles to be
- felt (or fleece) in any colour at all, but ideally a colour you can get a long piece of felt in, the full length of the crown (probably somewhere between 22 and 26 inches, depending on the head size you’re making the crown for)
- thread in colours to match your felt cake colour, your felt icing colour and your felt candle flames colour. You don’t have to have threads matching all your different candle colours as well.
- card stock (not much, less than half of a normal 8.5 x 11 sheet – you could use old greeting cards, too)
- wire – just something thin & easy to cut. You could also just use a few un-bent paperclips.
- white glue
- scotch tape
- masking tape
- wire cutters OR pliers with a wire cutting edge at the back OR some old wrecky scissors that can cut through thin wire
- cutting mat, ruler & rotary blade OR ruler, pen & scissors (basically, something with which to cut long straight lines through felt)
- fabric scissors
- straight pins
———————————————–
Putting it all together
1) First, cut two long rectangles of your cake-coloured felt, each 1.5 inches wide.* For length, consider the measurement (around the head) of the the head of the person who’s going to wear the crown. Each rectangle should be half of that measurement, plus 1/2 inch. So if the head measurement is 22 inches, each rectangle should be 11.5 inches long.
For reference, I wasn’t sure of the head measurement of the person I was making this for, but an average adult head size is about 22ish inches around. I just cut my rectangles to the full length of the piece of felt I was working with (so 11 inches), and the crown fit fine on all the 3 different adults I tried it on. It’s not a fancy hat for everyday wear – it doesn’t need to be the exact perfect measurement to serve its purpose.
*You can make them wider if you want (I wouldn’t recommend narrower though), as long as you’re consistent. Cut the rectangles for the cake and for the icing all to the same width (and length).
Then cut two long rectangles of your icing-coloured felt, each the same width and length as your cake rectangles.

2) Pin the two icing rectangles together at the ends and along one side. Then, use your fabric scissors to cut a randomly wavy line down approximately the middle of the felt. Ditch the bottom halves of the rectangles (or save them to use for another crown) and unpin the top halves to use as the icing on your birthday cake crown.


3) Pin each icing rectangle to one of the cake rectangles, matching up their long, flat edges. Put thread the colour of your icing felt in your sewing machine, and stitch along only the bottom, curvy edge of the icing pieces.


4) Now set those aside for the moment. It’s time to cut out the candles. I found that 6 candles fit nicely on the crown – whatever you choose, an even number of candles will be easiest to space out evenly around the crown.
Cut a rectangle about 1 inch wide and 3 inches tall for each candle.
Then cut rectangles of card stock about 1/4 inch narrower and a little shorter than your candles. Cut one rectangle per candle.

5) Now cut pieces of wire a couple inches long. Tape them to one end of each card stock rectangle, so about half the wire sticks out the top of the paper rectangle.

6) Put a couple lines of white glue along each piece of card stock, and glue them to each of your felt candle pieces, leaving an edge of felt visible around the card stock on the sides and at the top where the wire comes out. Some of the glue may seep through the felt, so do this over a piece of scrap paper or other non-critical surface, and flip them over felt side up once you’ve glued the card stock down.
You may not think that using white glue on felt will work very well, but for this purpose trust me, it will work just fine. Don’t use a glue gun, whatever you do. That will just create a mess, and one that you can’t sew through if the glue seeps to the edges of the felt.

7) Once the glue is dry, take each felt-and-cardstock-and-wire candle piece, and pin it to another piece of the same colour of felt. This other piece of felt will not yet be cut into the shape of the candle. If possible, however, line up the top of the candle (where the wire pokes out) with a straight edge of the larger piece of felt, as in the picture below.

8) Now, stitch around the sides and top of each candle, using a straight stitch. Because I was in a rush, I decided not to worry about matching thread colours for all my candles, and instead just used white for each of them. It had a nice outlining effect, to. However, you probably only want to do this if you know you can sew a nice tidy, straight stitch, because the contrasting colour will make any crooked or messy stitching show up way more clearly.
Be careful when you stitch over the wire at the top of each candle. Just slow down a bit as you go over – this is like sewing over pins, which you’re not supposed to do, but we all actually do it at least sometimes and those few times aren’t going to break your machine. Occasionally they’ll break a needle, or bend a pin. That’s why you want to go a bit slowly for this part.

9) Once that stitching is done, use your fabric scissors to carefully cut around the felt rectangle of each candle, so that now your candle is, in fact, a rectangle on both sides. If you didn’t line up the top of your candle with a straight edge on the back piece of felt, you’ll need to cut slowly and carefully behind the wire, so you don’t cut through the wire itself.


10) (Now I’m actually going to go a bit out of order here from the way I did things when creating my own crown, because I realized afterwards that it would have been easier to do it this way. So in the next few pictures you may notice that my candles are already sewn onto the cake-and-icing rectangles. Just ignore that for now.)
Take a small piece of yellow felt and fold it in half. Cut a candle flame shape through both halves of the felt (this ensures that both sides of the flame will be the same exact shape). Do this once for each candle you have for your crown.

11) Now cut a very small strip of masking tape (about 1/4 inch tall). Fold it around the end of wire sticking out of one of your candles, so that the wire is in the middle of the tape. Make sure the tape is well secured to the wire. Repeat this with each of your candles.


12) Apply a dab of white glue to one side of each piece of masking tape (or directly to one of the candle flames), and glue the tape to the felt candle flame. Then apply glue to the other side of the tape, and glue the matching candle flame piece to that side. Let dry.


13) [optional] Stitch around each candle flame, just inside the edge, using matching thread. This is finicky and not strictly necessary, but I prefer to glue and stitch when possible, for extra durability. Plus I think the outline of stitches on each flame looks kind of nice. But like I say, this is some very finicky stitching, so you may want to skip it. Just make sure each flame is well glued and fully dry before moving on.

14) Take your two cake-and-icing rectangles, and place them one on top of the other, right sides together. Pin them together at one end and sew them together there, using a 1/4 inch seam allowance. (As mentioned previously, I did things in a different order when I put this together – ignore the fact that the candles are already attached to the cake in the picture below.)

15) Take this one long cake-and-icing rectangle and place it face down. Take your candles and place them along the lengths of the two rectangles, evenly spaced. (For spacing purposes, keep in mind that you’ll lose about 1/2 inch of space between each rectangle, where their ends get sewn together.) Pin each candle in place, with the bottom of the candle about 1/8 to 1/4 inch above the bottom of the cake-and-icing rectangle it’s pinned to.

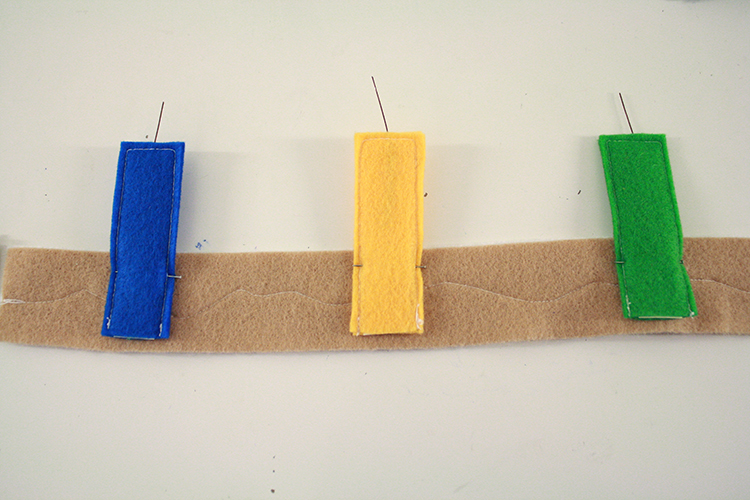
16) Put your icing-coloured felt in your sewing machine, and sew along straight edge of the icing, thus securing the both the candles and the top edge of the icing in place.

17) Take the whole thing, cake and candles now attached together, and lay it out face up on top of another, long piece of felt (or a couple shorter pieces of felt sewn together at the ends). You are now going to sew around the entire edge of the cake-and-icing section of the crown, on top of the other lines of stitching there. Change thread colours to match the cake and the icing sections. Sew right overtop of the candles where they protrude from the cake.


18) Cut around the edge of the cake-and-icing piece, cutting the larger felt behind it into the same rectangular shape. Cut carefully behind each candle.

19) Overlap the two open ends of the crown by about 1/4 inch and stitch them down, one on top of the other.

20) Sing happy birthday to your friend, and let him or her bask in the glory of this wonderful birthday headgear. Good luck blowing out these candles!

