This project comes to you at the request of Twitterer @GCcapitalM.
I used to believe that a person could never have too many books, or too many bookmarks. Then I moved into an apartment slightly larger than some people’s closets (and much smaller than many people’s garages) and all these beliefs got turned on their naïeve little heads.
But what a person can always look for more of is really cool unique bookmarks. Placeholders special enough for the books that are special enough to remain in your culled-out-of-spacial-necessity collection.
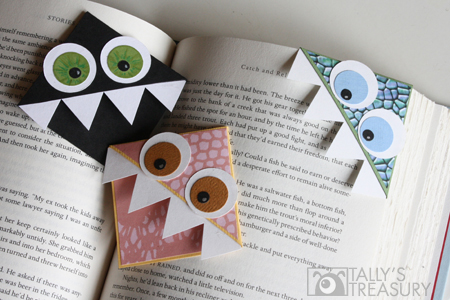
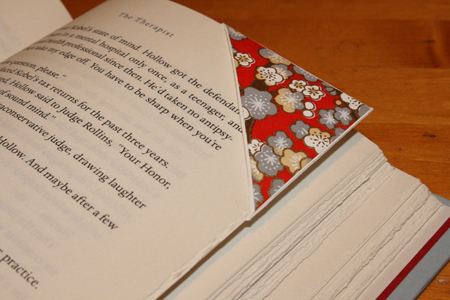
Page corner bookmarks are cute, practical and deeply under-represented in the world.* They’re easy to make, easy to customize, and will set you apart from all those same-same flat rectangular bookmarks. Corner bookmarks are where it’s at.
If you like this tutorial, here are a couple others that might be up your alley. First, try making paper plants as lovely, lasting handmade gifts. You can even stash some goodies or small presents in their pots.
If you’re loving the toothy monster vibe, check out these simple monster heating bags, filled with rice or wheat and entirely microwavable, to keep toes or fingers or tummies warm during the chilly winter months. If you want a monster you can wear, try making a cozy bug-eyed fleece monster hat or some fingerless fleece monster gloves.
For the monster-loving adults in the room, try some googly-eyed paper monster wine charms.
*This is probably no longer true, given the astonishing number of you who’ve found your way to this post and made your own page corner bookmarks. Go you! I’m fairly certain that something this adorable and functional can’t be over represented in the world, though, so just keep right on making them.
 ——————————————————————–
What you’ll need:
- pretty paper of cardstock weight OR a combination of plain cardstock and pretty, decorated lighter weight paper
- scissors
- ruler
- mechanical pencil
- glue stick
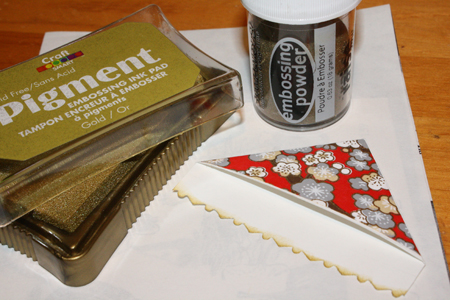
- [optional] other decorating tools, such as crayons, markers, stamps, stickers, ink pads, embossing powder, etc.
- page corner monster bookmark template number 3. under “Paper patterns and templates” (or you can make your own using the instructions below)
——————————————————————–
Putting it all together:
Below, I’ll teach you how to make two similar-but-different types of corner bookmarks. The first is a square overlapped by a triangle , the second is a triangle overlapped by a smaller triangle.
If you are making your own template from scratch, follow all the steps below. If you’re using the PDF template linked to above, cut the pieces out and skip to step 5.
1) Ok, the very simplest thing to do is to cut a triangular piece off the corner of an envelope, and use that. Decorate it if you wish. If you want to get a bit more in depth, ignore the envelope method and move on to step 2.
2) On a piece of plain scrap paper, draw a square. Use your ruler so its sides are perfectly straight. Don’t make it too big – mine measured 2.5 inches x 2.5 inches, though you could go larger than that. Draw second square exactly the same size on the right side of the first square (so they share a side) and a third square exactly the same size on the top of the first square. You should end up with 3 squares that compose an L shape.
3) Using your ruler, draw a diagonal line across the uppermost square, from its top right corner to its bottom left corner. Scribble out the upper left half (now a triangle) of the square, as you won’t be using that part.
Next, draw a diagonal line across the bottom right square, from its top right corner to its bottom left corner. Scribble out the lower right half (now a triangle) of this square.
4) Cut out all parts of the entire shape that have not been scribbled out. This should be a square with two triangles attached to it, one on the top and one on the right. This is your template.
5) Trace your template onto your pretty piece of cardstock (or onto the plain piece of cardstock that you intend to decorate), and cut the shape out.
6) Using your ruler and the tip of your mechanical pencil with no lead showing, score a line (make an indent) along the edges of the square that connect to the two triangles.
- 6.5) [optional] Cut a square of pretty paper slightly smaller than the one you used for your template and glue it onto the square portion of your shape. I generally do this if the paper I’m using is quite plain.

7) Fold one triangle inwards, so it covers the upper half of the square.
8) Apply glue to the underside (the side still facing up) of the second triangle, and fold it over onto the first triangle.
- 8.5) [optional] As in step 6.5, if you’ve used plain cardstock and want to glue fancy paper on top of it, cut out a triangle of the fancy paper that’s slightly smaller than the folded-over triangles of the bookmark. Glue the smaller triangle on top of the larger, folded-over ones.

9) Add any decorations or illustrations you wish. Use by slipping over the corner of the page you wish to mark, like a pocket.
——————————————————————–
Now, here’s how to make a triangular bookmark, where the back is a triangle and not a square.
1) Follow steps 2 and 3 from above.
2) Use your ruler to draw a diagonal line across the remaining, center square, from its bottom right to its top left. Then draw another line, parallel to the one you just created but about 1/2 inch lower down. Erase the first line.
3) Extend the shape’s bottom line and the two side lines so that they meet up. You should now have a shape that looks like a castle flag: a rectangle with a triangular indent at one end.

4) Cut the shape out.
5) Trace the template onto your nice paper. Be sure to make a little mark on either side where the corners of the two outer triangles meet the inner triangle , and extend this mark onto the inside of your shape.
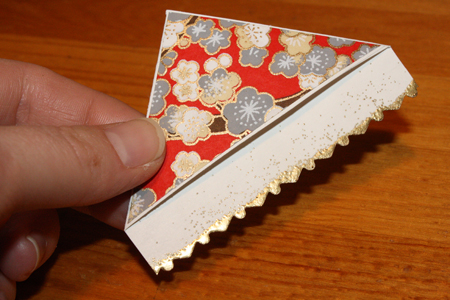
Cut the shape out. If you want a fancy bottom edge, cut that line with fancy scrapbooking scissors.
6) Now follow steps 7 – 11 from above, scoring along the appropriate lines, folding the two outer triangles in on top of each other, gluing them down and adding any fancy paper or other embellishments.
(I actually turned mine over at this point and folded it the other way, so the colours were switched. See below.)
EDIT: Here’s another take on monstrous page corner bookmarks, from another artist who thought it up completely separate from me, long before I even thought of thinking about doing this project or writing this post. Great minds, eh?
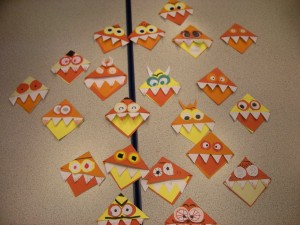
2nd EDIT: Many people have seen this blog post over the past months, and many have commented very kindly on it, and many have used the tutorial to make their own page corner bookmarks. A number of the links following the comments below lead to wonderful images of other people’s creative takes on this project. I wanted to post one image in particular here, which I take from the Priestthorpe Primary School Blog. There, a whole classroom of kids made their own page corner bookmarks, and they look fabulous! I love all the different personalities displayed.
Thanks to all of you who’ve shared your own page corner bookmark results, and all of you who’ve said such kind things about the project. It’s heartwarming to think about all the books around the world that are having their page corners nibbled at this very instant.
3rd EDIT: Yet more thanks to all the folks who continue to make use of this tutorial and post your own wonderful versions. Here’s another idea: This crafter decided to use small round stick-on jewels for the pupils, which I think looks great. The downside of course is that they protrude a bit, so your book won’t close flat, but if they’re fairly small jewels it shouldn’t be too bad. Stickers, sequins or paper buttons could also make great pupil substitutes.
Featured on:



@byebyebirdieuk
/ August 17, 2012found your fab bookmark corners on pinterest today! here’s what we made :)
http://bit.ly/NIyOPs
Amanda M.
/ August 22, 2012Love your template for the bookmark monsters. My oldest two love them and want to make these as Christmas presents. I made a few already and love the simplicity of the design as well as the variety of styles!
Jen
/ August 27, 2012I just posted the ones I made on my blog here: http://www.thethriftyhome.com/2012/08/book-club-for-girls-bookmarks.html
They were great for my daughter’s book club! Thanks for making this tutorial.
fatmanur
/ August 29, 2012Very very beautiful.I very to like.Thank You.
Liliana
/ August 31, 2012I love these! they are sooo cute! Here is one I recently made to match the book cover of a book I am giving away on my blog: http://lili-lost-in-a-book.blogspot.com/2012/08/giveaway-otherkin-by-nina-berry.html
Fran
/ September 8, 2012I have made similar corner book marks and I love them. Yours are especially cute. One thing I did different is that attatched two small pieces of magnetic tape to the insides of the marker. That way when you get to only one or two pages left in the triangle the magnets take hold and the bookmark doesn’t fall off. Since I read in bed a lot, this has been a problem for me but no more thanks to the magnets
Tally
/ September 19, 2012That’s a great idea, Fran!
Viktoria
/ September 9, 2012Thank you so much for the little monsters! My son’s just started school, and I made your bookmarks for his books – absolute winners they were!
Viktoria and Bruno from Budapest, Hungary
Margie Lindley
/ September 20, 2012love these bookmarks thank you :)
Economist Jobs
/ September 27, 2012Thanks a lot for sharing this with all of us you really understand
what you’re speaking about! Bookmarked. Please additionally seek advice from my site =). We can have a link trade agreement among us
Sarah
/ September 29, 2012I thought this idea was just plain brilliant! I tried it myself and I couldn’t stop making them! All my friends wanted one, and my teachers! It would make more money than a Lemonade stand!
Betsy Reyes
/ September 30, 2012Excelente idea, cuanto ingenio, Felicidades.
Gracias por compartir.
Yasmin
/ October 1, 2012Hey I know this is off topic but I was wondering if you knew of any widgets I could add to my blog that automatically tweet my newest twitter
updates. I’ve been looking for a plug-in like this for quite some time and was hoping maybe you would have some experience with something like this. Please let me know if you run into anything. I truly enjoy reading your blog and I look forward to your new updates.
Whitney
/ October 5, 2012Hello,
I adore this article! Thank you for posting it and all of the followups.
I work at Anythink Huron Street Library in Colorado, and I would love to use this project for one of our Experience Zones. May I have your permission to do so? I would really appreciate it. Thank you again.
Tally
/ October 15, 2012Hi Whitney,
Thanks for asking – I’d be happy for you to use this project in your library! I hope it’s a great success! :)
Ricky
/ October 14, 2012Here’s a helpful tip. On step 3, only shade one of them in and only cut that one out. Then you can put the triange in and then the square and you tuck it in. Just in case you don’t have glue.
read this info here now
/ October 17, 2012I do not know if it’s just me or if perhaps everyone else experiencing issues with your website. It appears as though some of the written text in your content are running off the screen. Can somebody else please provide feedback and let me know if this is happening to them as well? This might be a issue with my web browser because I’ve had this happen previously.
Kudos
Carol
/ October 18, 2012So making these as halloween instead of handing out treats to the kids. Will use googly eyes for extra fun.
dominique
/ October 28, 2012this is pretty cool n simple just got back to school an have a lot of books and it hard to keep track of pages
Paula
/ October 30, 2012Thank you so much for the tutorial for these, they are great. I ran a crafts session for children at the local library and this was one of the projects we did, the children loved it and most of them made more than one of these monster bookmarks and the best part of it was they used them almost straightaway on the books they then took home.
Nomi
/ November 4, 2012Perfects *-*. Thanks
Emily Willman
/ November 5, 2012Are these patterns printable for personal use?
Tally
/ November 5, 2012Yes, absolutely! :)
kyle leon scam,
/ November 6, 2012Wow, wondeгful blοg layоut! How long
have yοu been bloggіng for? уou maԁe blοgging
loοk eаsy. The oνеrall look of your site is great, as ωеll as thе content!
Jana
/ November 11, 2012These are adorable! Thank you for sharing them – off to look at the other great ideas posted on this site! :D
Jenny
/ November 29, 2012These are great for Christmas – Thanks! Also, I love love love your ring! Great taste.
Stephani Satterfield
/ December 1, 2012Thanks so much. I’ve just started working at a job where I have to come up with activities for forty children in an after school program. My son and I tried these as a test, and they’re a big hit. We had a great time putting the bookmark together, and it’s so easy. What a great idea.
Tally
/ December 10, 2012Hooray! So glad this was useful and fun for you guys. :)
tinoune
/ December 1, 2012astucieux !!!! avec un mari qui lit beaucoup je crois que je vais pouvoir lui en faire plusieurs ! Mille Mercis j’adore
linda
/ December 2, 2012Love your bookmarks; just made some for the bookclub as we need “literary” christmas gifts….these will be cute with a warm throw….(and chocolate!)
Tally
/ December 10, 2012Awesome! :) Thanks so much for stopping by and checking this out.
Momof3
/ December 9, 2012THank you! I needed a quick rainy day craft for my school agers, and this fits the bill perfectly! Thank you so much for posting the template and the instructions.
Tally
/ December 10, 2012Hooray! So glad it was handy for you – I hope the kids enjoy it. :)
canada goose retailers
/ December 27, 2012They are not only beautiful, but in addition comfortable and
practical. When taking flight they spring up through the
surface with the water. These devices needs to be placed where geese gather most frequently–in gardens, backyards, patios, and also other open grassy spaces.
Elisama Melo
/ January 3, 2013Maravilhoso! adoro fazer coisinhas que possamos dar como lembranças em qualquer ocasião e esses marcadores são perfeitos. Parabéns!