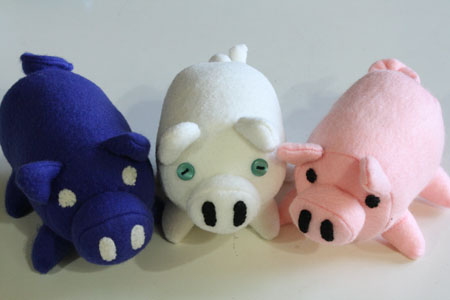
Play Minecraft, watch Top Gear, get pig.
This phrase became a meme during Desert Bus 4 this year, and pigs (sugared pigs in particular) were much in demand during the event. If you don’t know why, it’s probably not worth trying to figure out. It’s one of those “you had to be there” things, and attempting to explain it will only leave you wondering at the state of my mental faculties. Basically, the end story is that everyone needs a pig or three. Here’s how to get yours.
What you’ll need:
- fleece (about 1/4 yard)
- felt in a second, contrasting colour (you only need a tiny piece of this, say 4″ x 4″ or less)
- needle
- thread matching your 2 fabric colours (part of the key to this turning out very well is to find thread that matches your main fabric colour as exactly as possible)
- ruler
- paper scissors
- fabric scissors
- sewing machine
- stuffing
- compass or circle cutter (only if you are creating your own pattern)
- plush pig pattern – number 1. under “Sewing patterns”
Putting it all together:
1) To use the exact pattern I’ve created, print the pdf, cut out the pieces, and cut the appropriate number of each piece from your fleece. That’s 1 small circle (rear), 1 large circle (face), 1 oval (nose), 1 long narrow rectangle (nose), 2 tiny ovals from different-coloured felt (nostrils), 4 ear pieces, 4 feet pieces and 1 tail piece. You’ll also need to cut out a rectangle of fleece measuring 8.5″ x 4″.
To make your own pattern (if, for example, you wanted to do a larger pig, or a larger and fatter pig with smaller feet/ears), cut pieces as follows:
- cut a rectangle any size you like
- cut a small thin rectangle (at least 2 inches wide) for the tail
- cut 1 small circle and 1 larger circle for the rear and the face – measure the width of your folded-over rectangle, and multiply this number by two to get the circle’s circumference. Divide the circumference by pi to get the diameter, which is what you’ll need to use a circle cutter or compass to measure and create a circle the right size. Cut out your pattern circle, pin to fabric and cut one. Pin same pattern piece to more fabric and make a second, larger circle by cutting about 1/4 inch out from the edge of the pattern piece.
- cut 4 half ovals with pointed ends for the ears
- cut 4 large half circles (to be folded in half) for the feet
- cut 1 small oval and 1 long thin rectangle for the nose
- cut 2 tiny ovals of a contrasting fabric for the nostrils
You can make a pig any size, though any smaller than my PDF pattern and the machine stitching and turning inside out of pieces will get pretty tricky. You can also try making a larger body and nose with the same sized ears and/or feet, to give it a more out-of-proportion adorable look.
2) Fold the large rectangle in half and sew the edges together with a 1/4 inch seam allowance.
3) Cut out the bum and face circles. Place the larger face circle inside the tube you created in step 2 and pin. You’ll have to bunch the circle together slightly between each pin to make it fit, since it is slightly larger than the tube’s opening. Then sew all the way around the circle.
4) Pin the small circle to the other end of the tube in the same way. Sew it the same way, except that you’ll need to leave an opening about 2″ long.
5) Turn the tube right side out and stuff it. Then hand stitch the opening shut.
6) Next, get your nose pieces: oval, long narrow rectangle and tiny nostril ovals. Center the nostrils on the larger oval piece and hand stitch them in place.
7) Head to your sewing machine and, with right sides together, sew one edge of the long narrow rectangle to the outer edge of the oval. You can pin this in place before hand, but it’s probably more trouble than its worth. I just sew slowly and line up the edges as I go. This is the most finicky part of the whole project. Luckily, we’re using very small amounts of fabric here, so if you screw it up just cut out some new pieces and try again. This sort of sewing just takes a bit of practice.
8) When you’ve sewn the rectangle all the way around the oval, trim the extra and sew the two ends of the rectangle together. I do this on the machine, but it may be simpler to quickly stitch it up by hand.
9) Turn the nose right side out and stuff it. Take your needle and thread and sew large stitches around the back of the nose, about 1/4″ from the edge.
10) Pull the thread tight and knot it.
11) Center the nose on the face, squish it a bit and sew it down. (Do this by putting a stitch into the face, then one into the base of the nose, and back and forth all the way around the nose.
12) Next, take the ear pieces and match them together in pairs. Sew along the edges.
13) Fold each foot piece in half and sew along the open edges.
14) Turn the ears and feet right side out. Use a chopstick or pencil tip to push the ends all the way out.
15) Sew the bottoms of each ear together with a few quick hand stitches, then sew them to either side of the head along the face-to-body seam line.
16) One by one, take each foot, stuff it and sew it in place. You can use a few pins pushed straight through the foot and into the body to hold them in place. Then sew through a bit of the body and up through the top edge of the foot, all the way around. Use small careful stitches. This is where, if your thread and fabric match as closely as possible, your stitches will mostly disappear. Using nice soft fuzzy fleece helps with this as well.
17) Last, take your small rectangle for the tail and fold one end over about 1/4″. Sew this down.
18) Now fold the long sides in to the middle, then fold the whole thing in half. The only raw edge showing at this point should be on the very end. Sew the two sides together.
19) Using your needle and thread once again, make a series of large stitches along the folded-over edge of the tail. Pull the thread tight (like you did with the nose), causing the tail to curl up. Hold the thread tight and knot it.
20) Sew the tail in place on the pig’s rear.
21) Find some appropriately sized buttons or cut out two small circles of felt and sew these on as the eyes.
22) If you haven’t already, go play Mincraft and watch Top Gear. And donate to Child’s Play because it’s an awesome charity and it’s all for the children.
GOT PIG.
[Notes:
– To make a pig with a shaker or bell inside (eg: as a baby toy), put a bell or some buttons or beans inside one of those yellow plastic Kinder Egg capsules and put it inside the pig’s body during the stuffing step.
– To mix it up a little, try using a different colour of fleece for the front of the ears, tail and/or front of the nose.
– To make a felt pig, add about 1/4″ to the bottom of the ear and feet pieces. Fold this up and sew it down before sewing the ear pieces together and folding/sewing the feet pieces in half. This will give you cleaner edges, because felt won’t conceal its own raw edges as nicely and easily as fleece.]


