

Now that we’re well past Halloween, Thanksgiving and even the first days of December, I feel I can safely delve into the realm of Christmas decorations. Dante may not have mentioned it, but rest assured that there’s a special Hell for people who play Christmas carols in the malls before December first.
Christmas is often a time of stressful expenses, overbearing in-laws and fears of giving in to the delicious consumption of whole blocks of fudge. In response, this week’s post is about creating lovely seasonal decorations quickly, easily, at no cost and with no saturated fats.
Paper. It’s all over your house, no doubt. Computer paper, construction paper, wrapping paper, newspaper, cardboard boxes, old birthday and holiday cards, bills, etc. For this project you’ll want thicker, tougher papers like cardstock. Old greeting cards are perfect. Or you could glue wrapping paper onto a flattened cereal box and cut shapes from that. If you’re a scrapbooker, this is an opportunity to use up all those bits and pieces of pretty paper that are flooding your desk drawers.
What you’ll need:
- Paper (scraps of coloured paper, old greeting cards, old magazine covers, wrapping paper glued to thin cardboard, etc.)
- circle cutter OR circle/other shape punch OR various sized jar lids plus a pencil and scissors
- thread (any colour you like)
- sewing machine
- [optional] beads or sequins to hang from the end of your garland
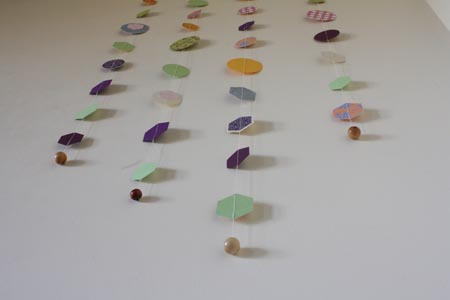
Putting it all together: (The garland in my example photos is a non-holiday one. The photo above is an example of one I made from an old Christmas card.)
1) Cut a whole lot of circles (or other shapes) of various sizes from your paper. You can use many colours, you can alternate colours in a pattern or randomly, you can intersperse plain shapes with those showing pictures – whatever your inner Martha Stuart desires.

2) Lay out your shapes in the order you want them to go in. As you can see, I made a series of four strands to hang next to each other, rather than one long garland. You can go either way. You can also put two shapes back-to-back if one side of the paper is blank, or layer a smaller shape on top of a larger shape.


3) Stack the shapes in order and take them to your sewing machine. (If you’re doing multiple garlands, do this and the next steps one garland at a time.)
4) Thread your machine, then pull the needle and bobbin threads out so you have about a foot of thread dangling. Sew down the middle of the first shape (remembering to backstitch at the beginning to knot the thread). If you want gaps between pieces, pull the thread out a little before sewing through your next shape. If not, sew the second piece right up next to the first.


I put gaps between my shapes, and to get each gap about the same length I’d pull the previous shape back so it dangled just over the back edge of my sewing machine, then sew on the next one. Lather, rinse, repeat.
5) Continue like this until you’ve sewn all your shapes onto the garland. Be sure to backstitch at the end, then pull out the thread again so you have about a foot of thread and cut it.

6) Depending on what you’re going to do with your garland (eg: hang it on the wall, hang it from the ceiling, wrap it around a Christmas tree, etc.), you now have a few different options that you can use and combine as you wish:
- Tie a loop in the thread at one or both ends of the garland.
- Tie beads or sequins onto one or both ends of the garland.
- Simply trim the thread at both ends so your garland begins and ends with a piece of paper.


7) Decorate the heck out of your or someone else’s living room.

You could also try sewing a line of ribbon down the middle of the garland, or tying little ribbon bows between the pieces of paper, or anything at all really. You can give your garland a theme, either colour or picture-wise, or just go with a generally pleasing aesthetic. Have fun!
