• Categories

  • Archives

Piranha Plant basket

Piranha Plant basket 2

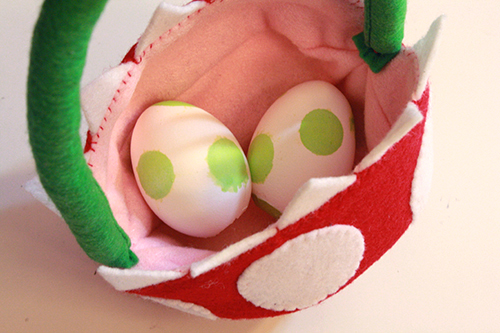
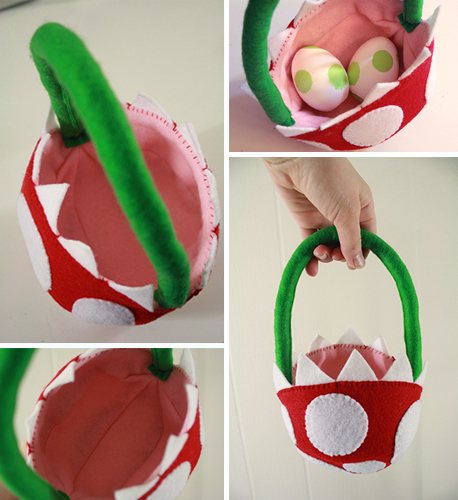
In a season already focused on the themes of resurrection and giant rabbits that hide chocolate everywhere, how weird is it really to make a basket with teeth? I say not all that weird. Whether for your Easter chocolates or to hold yarn supplies, make yourself a stylish Piranha Plant basket. Maybe all those teeth will get finally the message across to your housemates to stop nibbling the ears off your Easter bunny. Though of course, the basket itself might devour your bunny instead…

It also occurs to me that you clever crafters out there could find a way of mounting this on a good solid stem from underneath, and creating quite an eye catching candy dish for the coffee table. Now there’s a side tutorial for another day…

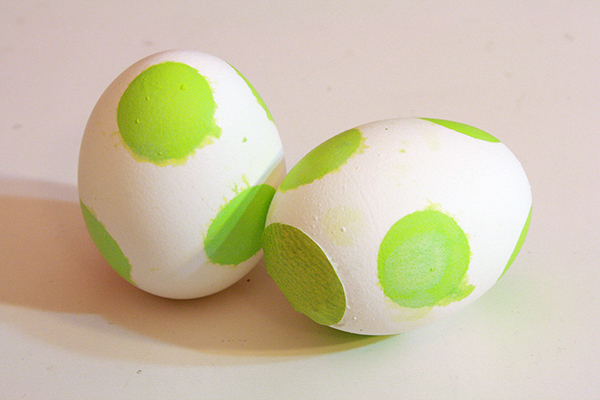
In addition to the basket, I’ve written a tutorial for dying Yoshi eggs, which is exclusive to my wonderful Patreon supporters! To become a Patreon supporter, simply head over to my Patreon page and pledge any amount you wish. You’ll be charged that amount for each full tutorial I post (not including bonus tutorials like the Yoshi eggs), which happens every other week. Any pledge of just $2 or more per tutorial will get you access to sweet bonus content like the Yoshi egg tutorial and more!

opener Read the full post »

Share

Protected: dyed Yoshi eggs

This content is password protected. To view it please enter your password below:

dyed Yoshi eggs – a bonus tutorial for Patreon supporters

opener

These dyed Yoshi eggs could be an adorable addition to Easter festivities, a Mario birthday party or various other occasions. Make other colours of polka dots for other Yoshis or for generic dinosaur eggs. Hide treats or even wee plastic dinosaur toys inside!

This tutorial will show you how to make nice round polka dots with dye, while keeping the rest of the egg its original white. It also covers how to pour out the egg’s insides through a small hole in the bottom (if you want to fill the egg with treats, rather than hard boil it), and how to seal up that hole again at the end. It’s like a 3-in one tutorial! With baby dinosaurs!

This is a special bonus tutorial I’ve posted for my supporters on Patreon. It pairs well with the soon-to-be-posted public tutorial for a Piranha Plant basket. And maybe a nice dry white wine. 

To become a supporter and gain access to this tutorial, simply head over to my Patreon page and pledge any amount you wish – you’ll be charged that amount for each full tutorial I post (not including bonus tutorials like this one), which happens every other week. Any pledge of just $2 or more per tutorial will get you access to sweet bonus content like this!


IMG_6844

craft draft

craft draft main photo

A few years ago, those Magic: the Gathering starter decks that Wizards of the Coast puts in PAX Prime swag bags got my friends and me playing Magic. Ultimately we all went different places with it. Some of them are really keen on pre-releases and sometimes go to FNM, a couple of them have gotten into Legacy and Highlander, others mostly play online, streaming their MtGO drafts, and the ladies often hit up our monthly Lady Planeswalkers’ night. Some of the group even make promotional videos for Wizards of the Coast.

I actually don’t play much anymore apart from Lady Planeswalkers’ night, because I’m usually too busy making plushies, including Magic: the Gathering plushies.

One form of play that all of us still enjoy now and then is drafting. In drafting Magic, there’s a group of usually 6 – 8 people, and each person gets 3 booster packs of Magic cards. Everyone opens up their first pack, chooses a card from it, then passes the rest of the pack to the person on their left (so they’ve also just been passed a new stack of cards by the person on their right). Everyone chooses a card from their new stack, then passes it to the left, and so on and so forth until all the booster packs have been opened and passed around. Then each person makes a deck out of the cards they chose, and people play each other with those decks.

Well, I decided that this gameplay could extend to other activities too. I decided to do a craft draft.

Read the full post »

Protected: being tricksy

This content is password protected. To view it please enter your password below:

hobbit hole greeting cards


IMG_6594 copy copy

First of all, did you see yesterday’s post? I have created a Patreon page and would love it if you took a few minutes to watch the video (oh my gosh video editing is such a time consuming pain, please go watch it and give me a pat on the back for just getting it done) and consider becoming a Patron! As I posted yesterday, your donations will help me to continue doing these tutorials and hopefully adding future tutorials for new and different projects and mediums.

A couple other things happened this past week. On Monday, I found out that at the end of this month the Canadian postal service is raising the price of letter mail by anywhere from 10 to 65 cents, depending on where you’re sending a letter to. This says 2 things to me:

  1. We Canadians should send all the letter mail we’ve been meaning to but procrastinating on NOW, before April 1st.
  2. After April 1st, any letter mail you send should be that much more special. It’s gotta merit that extra postage!
  3. Ok actually there were 3 things, and the 3rd is obviously: Canada Post is dumb. Again. Always.

The other thing that happened was my birthday. I turned 29 on Thursday, and the day was filled with Twitter and Facebook posts from friends and family near and far, all wishing me a happy birthday. I also received several snail mail birthday cards during the week. They’re seemingly small & simple things, cards and tweets, but they can have a huge impact. I felt so special & cared for, getting all those lovely little messages.

So taking a moment to send someone a nice personal message is excellent, and snail mail is awesome. And it’s still a pretty small expenditure even with postal price hikes – at most a couple bucks, even to send a card to the other side of the world.

I’m going to challenge all of you this week to send a card to a friend or a family member, just because. Just to say hello, and tell them you’re thinking of them, and brighten up their day. And to help you with that, I’m going to show you one super cute card that you could perhaps make to send someone this week.

IMG_6611

Read the full post »

I’m on Patreon!

Happy Thursday, everyone! This week’s regular blog post (which will be a tutorial for some super cute cards) is a little delayed, because I spent all my spare time this past week working on something else… a Patreon page!

Patreon page

As you can imagine, these tutorials take a lot of time and work to put together, and time can be awfully hard to come by. Individual commissions, Kickstarter plushie sets, weekly blog posts and tutorial creation together constitute a full time job, and I already have a 30-hours-a-week day job.

Setting up a Patreon page is one piece of my effort to move away from doing my crafting just on the side, and start focusing on it as my daily, during-work-hours concern. The money you donate via Patreon will help me afford (quite literally, haha) the time to keep making tutorials while I also find, negotiate and work on other creative projects. It will help me purchase the necessary craft supplies, and perhaps invest in some new tools and materials to delve into even more types of crafting.

So please go check it out, give my video a watch (think of it as a bonus blog post for this week, because it certainly took more than enough time to be one!) and consider becoming a Patron and supporting the continuation of my crafting tutorials!